The subscription model provides services that allow your customers to pay regularly (monthly, quarterly, yearly) to receive products delivered to their home regularly. The benefits of the subscription model include:
Easy revenue prediction
Lower marketing costs
Increased customer loyalty
Easy up-selling and cross-selling
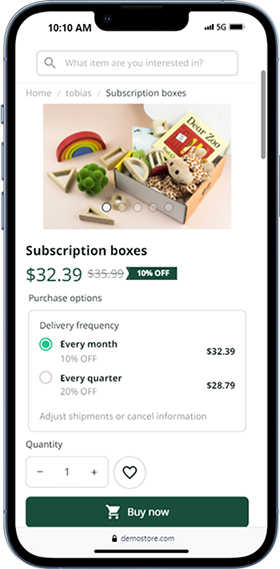
This guide will walk you through setting up a subscription model on ShopBase.
In this article
A. Eligibility requirements
B. Set up subscription model
C. Customize subscription block in Website Builder
D. Order management for buyers
E. Manage subcription from the seller's side
F. Disable subscription model
G. Additional notes
A. Eligibility requirements
Currently, the subscription feature on ShopBase stores is in the experimental phase. Please contact the sales/support team to explore this feature.
Before setting up your subscription model, ensure that your store meets the following criteria:
Platform: Your store must be running on ShopBase.
Template: You should be using the Website Builder template for your store design.
Payment gateways: You must be using one of the following payment gateways: Stripe, ShopBase Payments, or PayPal.
If your store connects to PayPal, ensure that your PayPal account has been granted permission to Save PayPal and Venmo payment methods, and the Vault feature is enabled in the app settings on the developer dashboard. Please refer to this article for detailed instructions.
For further assistance with payment gateways, please contact your account manager.
The subscription feature will NOT work with European payment methods or buy now, pay later methods (including PayPal Pay Later, Klarna/Afterpay). If these payment methods are enabled in the store, buyers may complete the first order, but the system will NOT generate subsequent recurring billing requests.
B. Set up subscription model
In the store admin dashboard, go to Apps > Installed Apps > toogle on and access the Subscription application.
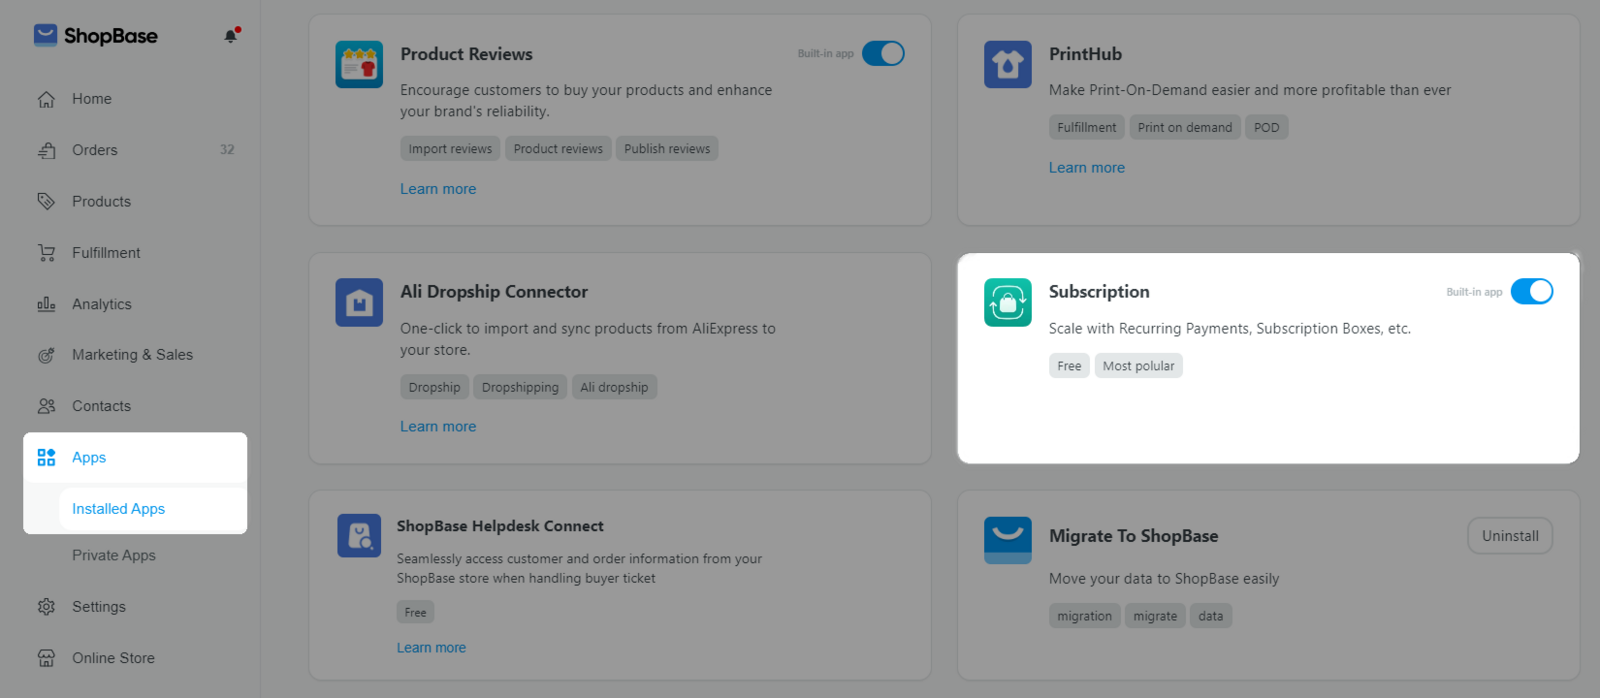
Set up subscription model
In the Subscription plan section, click on Add option to add a new subscription package.
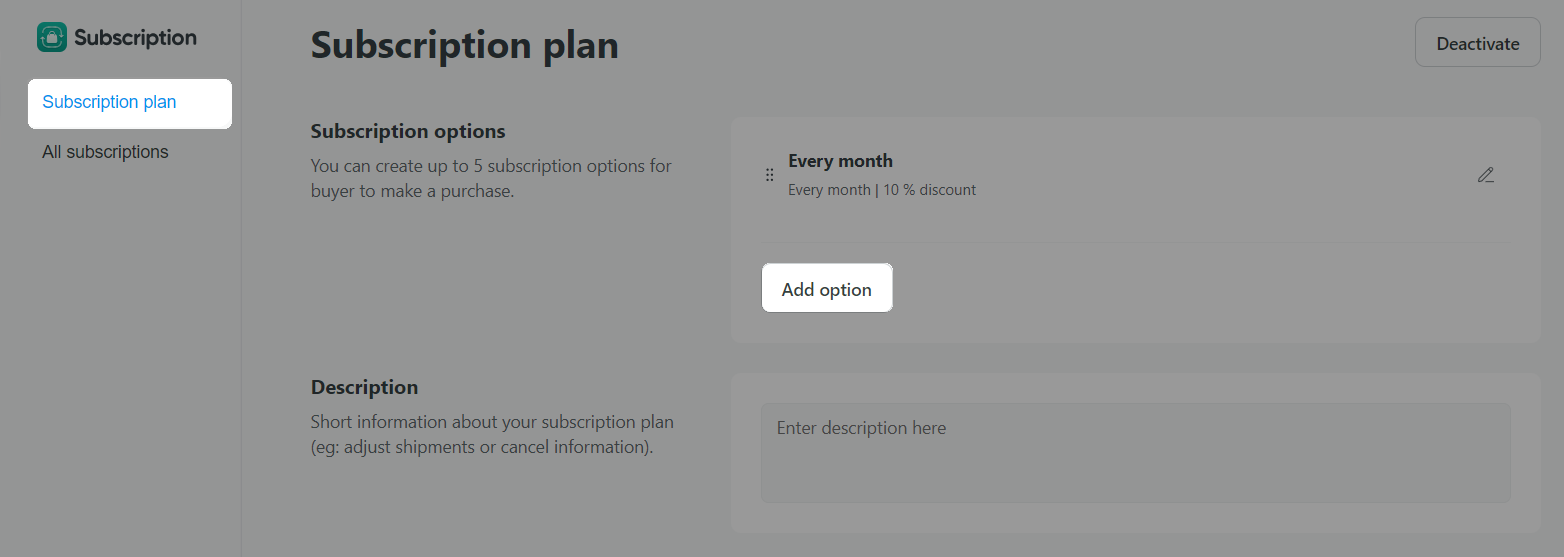
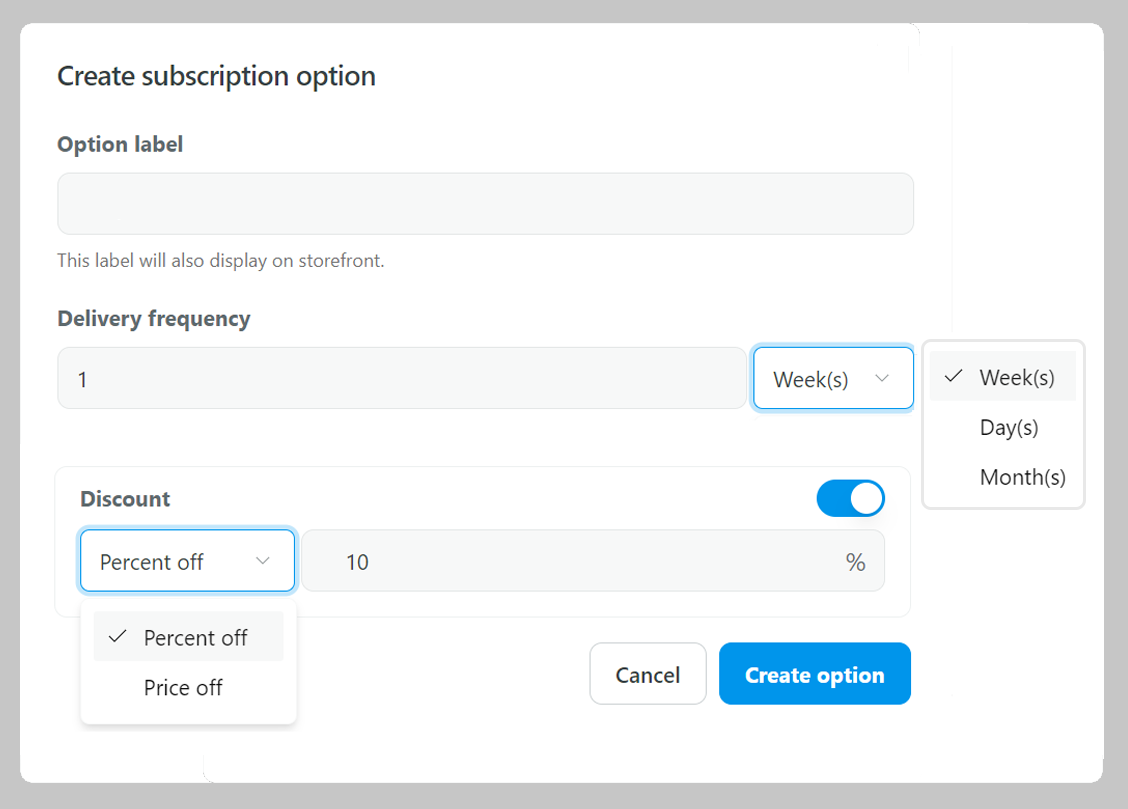
Set up information for subscription plans:
◈ Option label: Name the subscription service; this information will be displayed on your store. Example: Every month.
◈ Delivery frequency: Set the delivery cycle by day, week, or month.
◈ Discount: Configure discounts as a percentage (%) or a fixed amount off the product's sale price.
Description: Provide a short description of the subscription package; this information will be displayed on your store.
C. Customize subscription block in Website Builder
Add subscription options to the product page
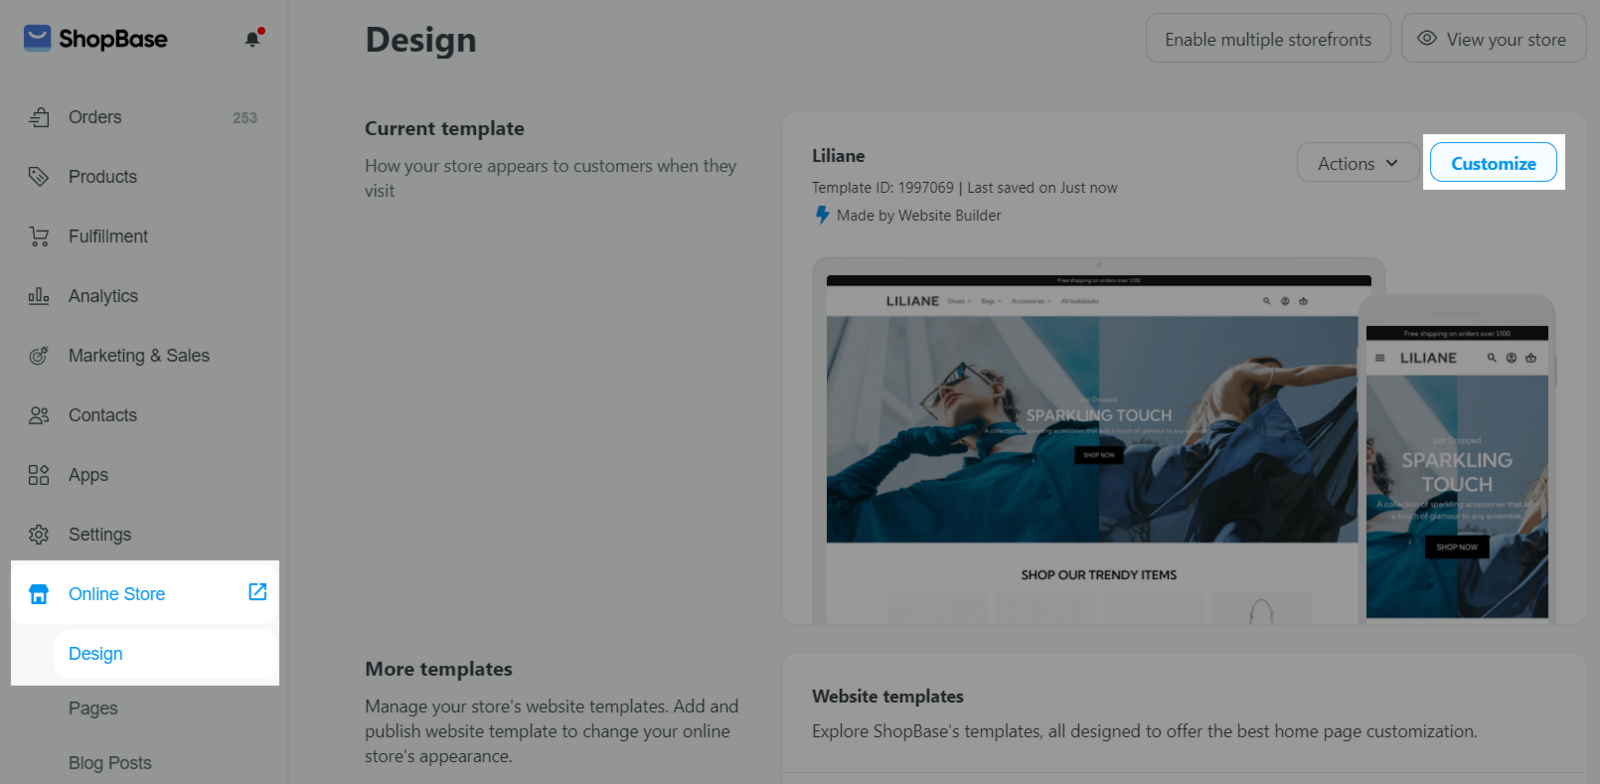
Navigate to Online store > Design > Customize.
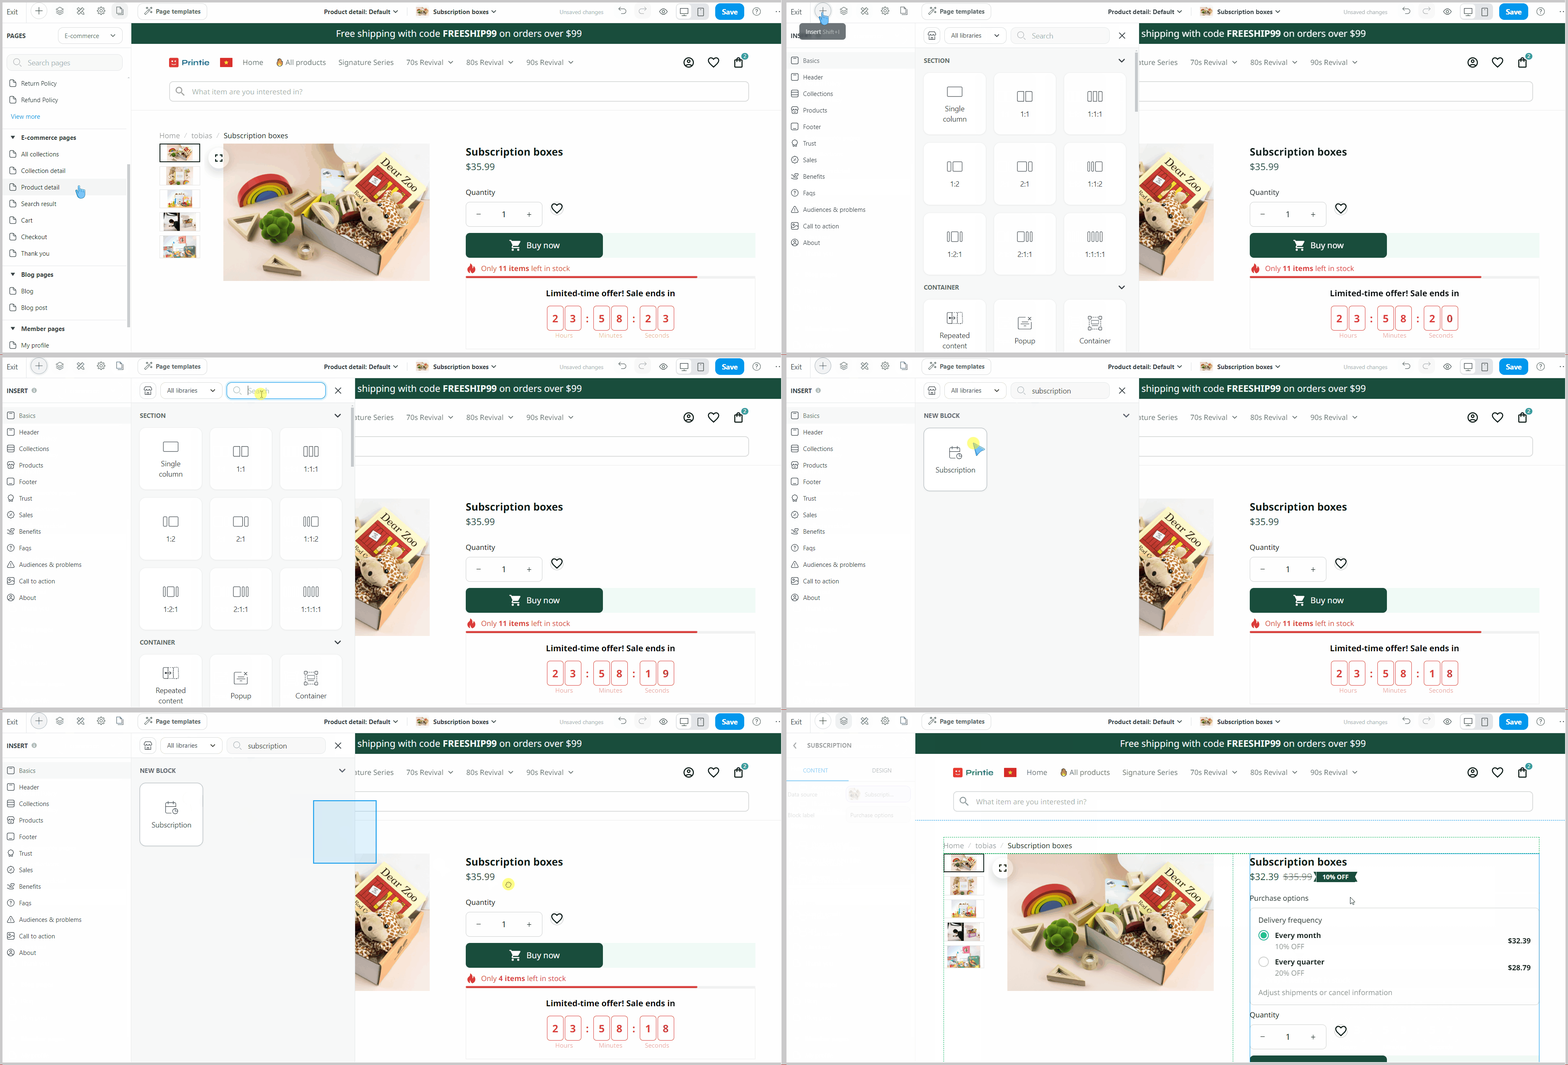
Go to the Product detail page and drag the Subscription block to your desired position. Edit the information in the subscription block as needed.
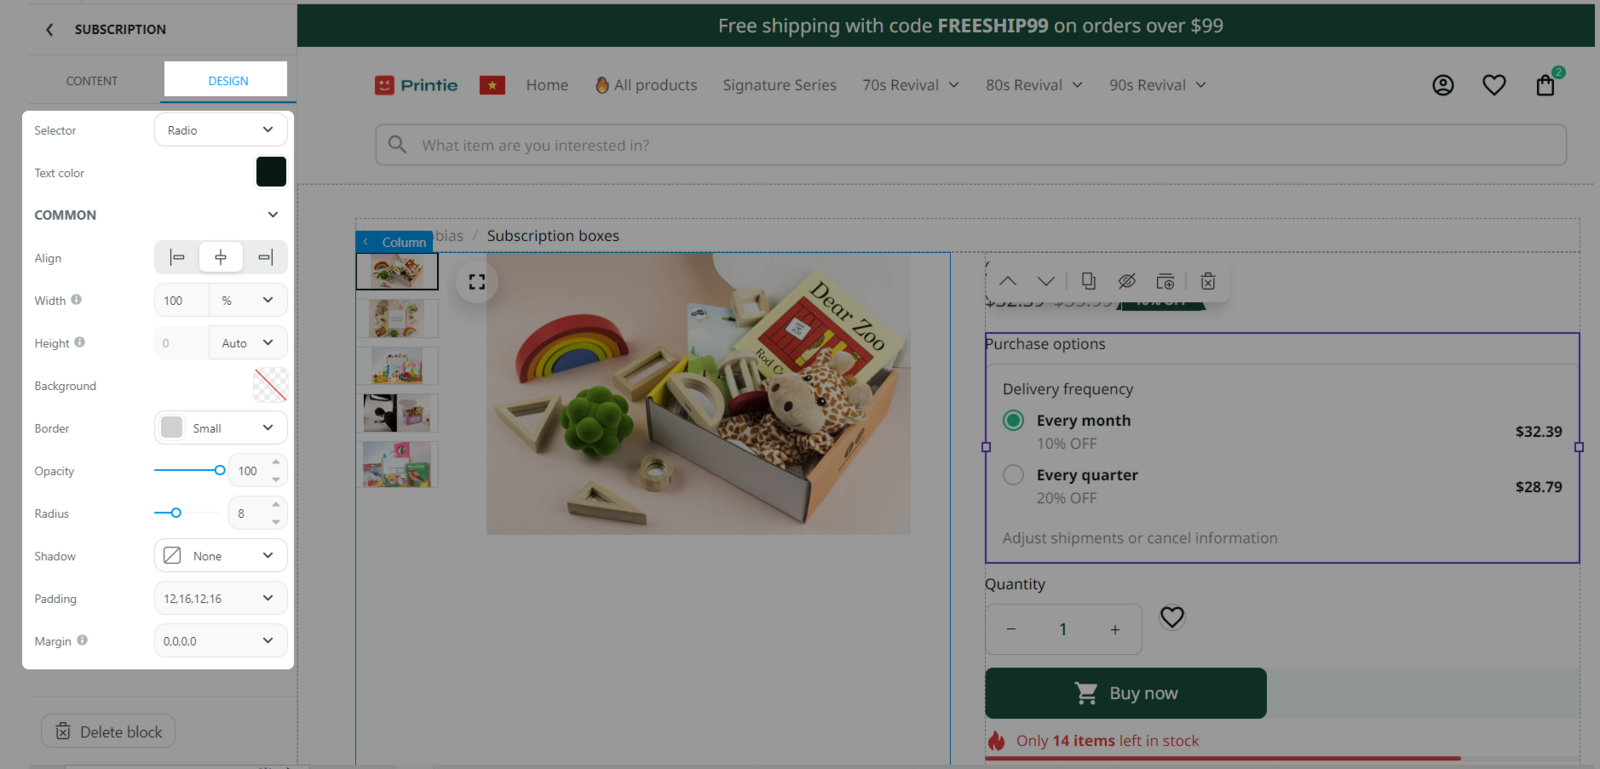
In the Design tab:
Selector: Choose one of two display options for the subscription options – either Radio buttons or a Dropdown menu.
Text color: Select the font color.
Other common settings: For more details, please refer to
this article.
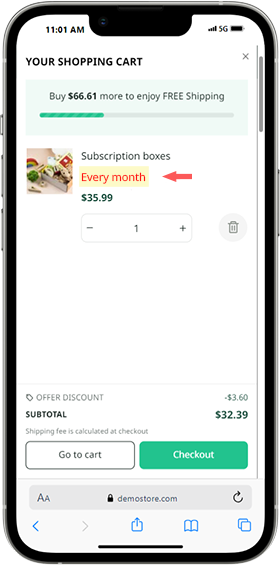
Delivery cycle will be displayed both on the cart drawer and cart page.
Show subscription recurring purchase information and policy on the checkout page
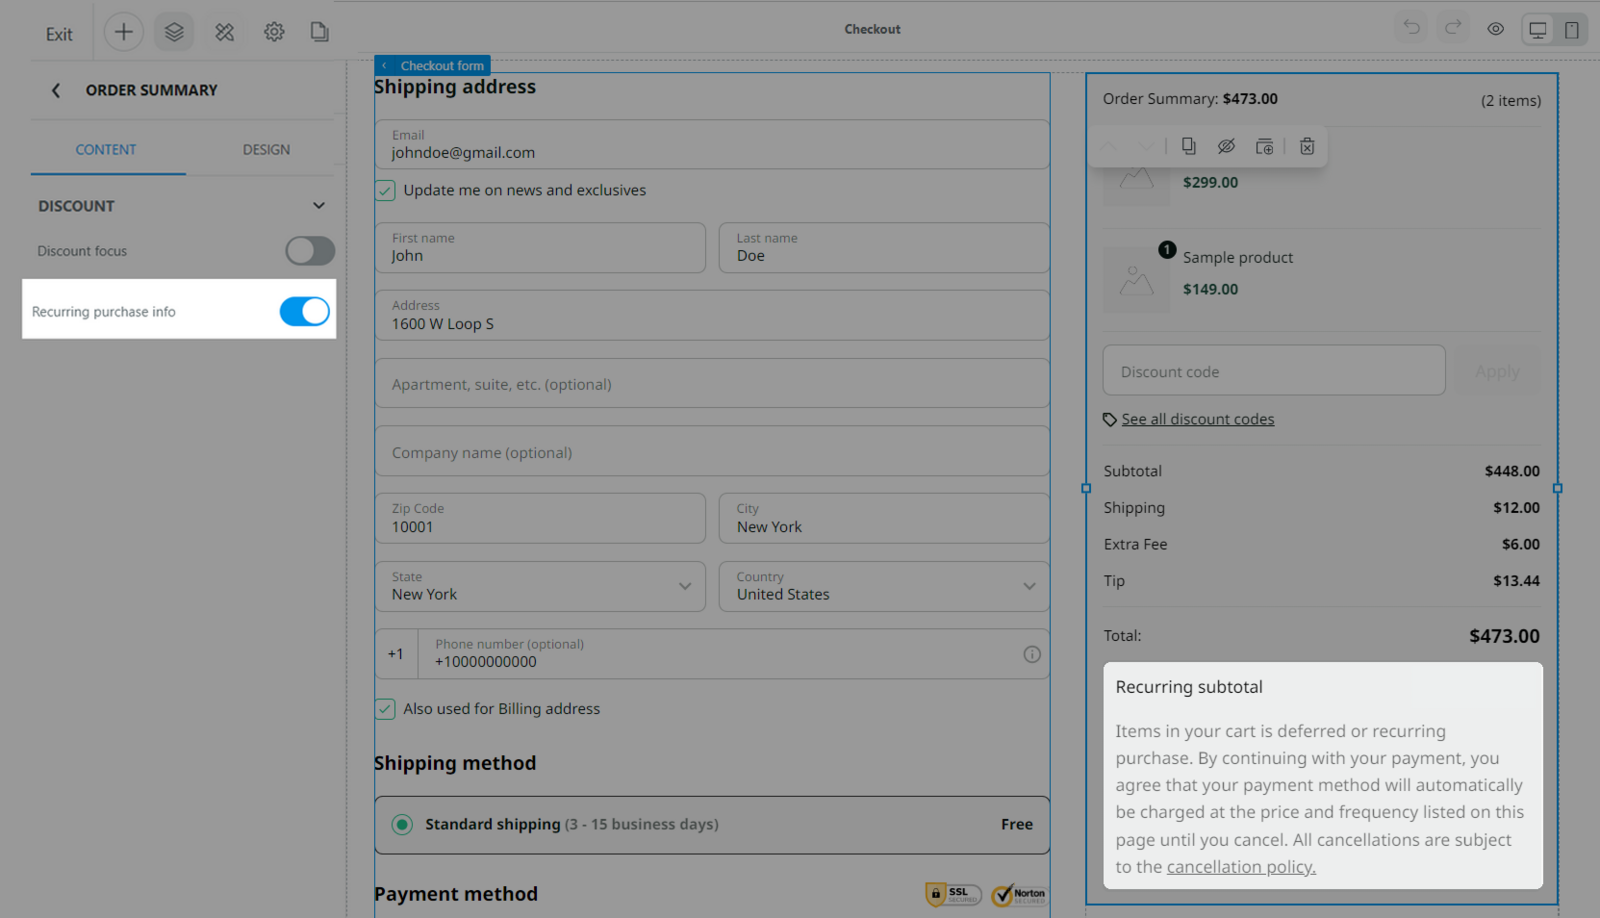
In Website Builder, navigate to Checkout > Order summary and enable the Recurring purchase info setting if you want to display the subscription policy on the checkout page. You can also customize the policy content by going to Online Store > Pages > Policy Pages.
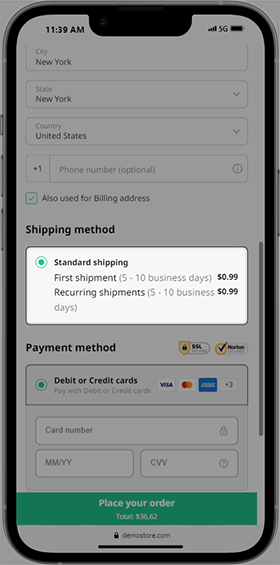
Detailed shipping information will be displayed for both the first shipment and the recurring shipments.
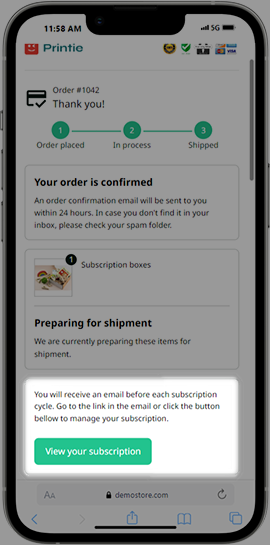
Subscription order Information will be shown on the thank you page and order confirmation email.
After successful payment, the thank you page and the order confirmation email will include a View your subscription button, allowing customers to access their subscription management page.
D. Order management for buyers
Customers can access the order management page via the View your subscription button on the thank you page or in the order confirmation email. They will need to use their purchase email to create an account and log in.
After logging in, customers will be directed to the All subscriptions section, where they can view all the subscriptions they have signed up for.

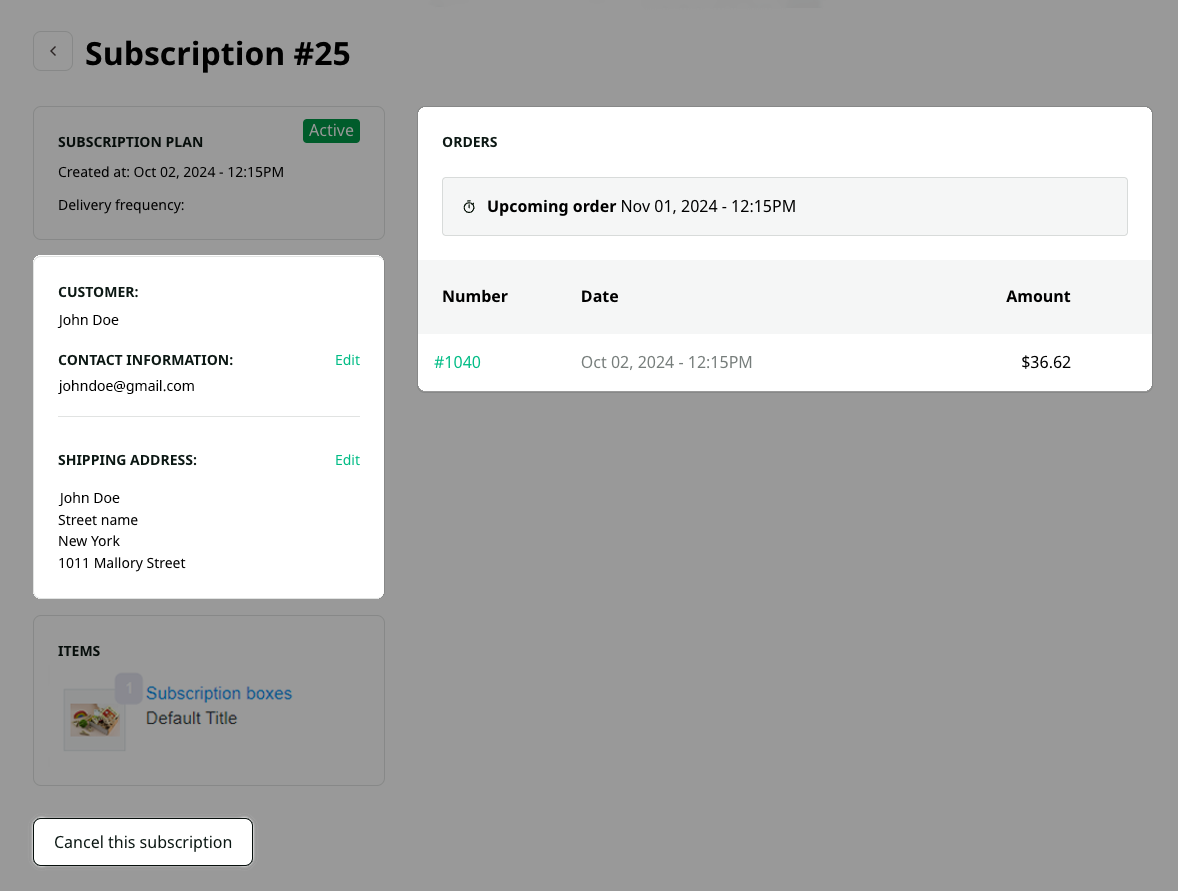
Clicking on each subscription to see the details:
◈ Order information, buyer details, and shipping address.
◈ Customers can edit the shipping address (they can modify specific address details but cannot change the country or state).
◈ Customers can cancel a subscription by clicking the Cancel this subscription button.
E. Manage subcription from the seller's side
Visit Subscription app and go to the All subscriptions section. The order information is categorized into the following tabs:
All: All users/customers.
Past due: Customers who have subscribed to a subscription package but whose payments have failed and are waiting for the system to send a retry payment request. The system will attempt to process the payment daily, up to three times. Customers will receive an email notification after each failed payment attempt.
Failed payment: Customers who have attempted to pay for their subscription package and have failed three times; the system will stop generating payment requests.
Active: Customers who are currently using and paying for their subscriptions regularly.
Canceled: Subscription plans that have been canceled by either the customer or the seller.

On the general management page, a summary of the order information is listed, including:
ID: Order ID.
Customer: Customer name.
Created at: Purchase date.
Status: Subscription status.
Delivery frequency: Delivery cycle.
Order total: Value of one order.
Total revenue: Total revenue from all orders in that subscription package.

Click on each line to view detailed information: customer information, products, invoices, and orders.
A subscription plan may have multiple invoices. Each successfully processed invoice will create a new order.
You can also cancel a subscription on behalf of the buyer by clicking Cancel subscription.
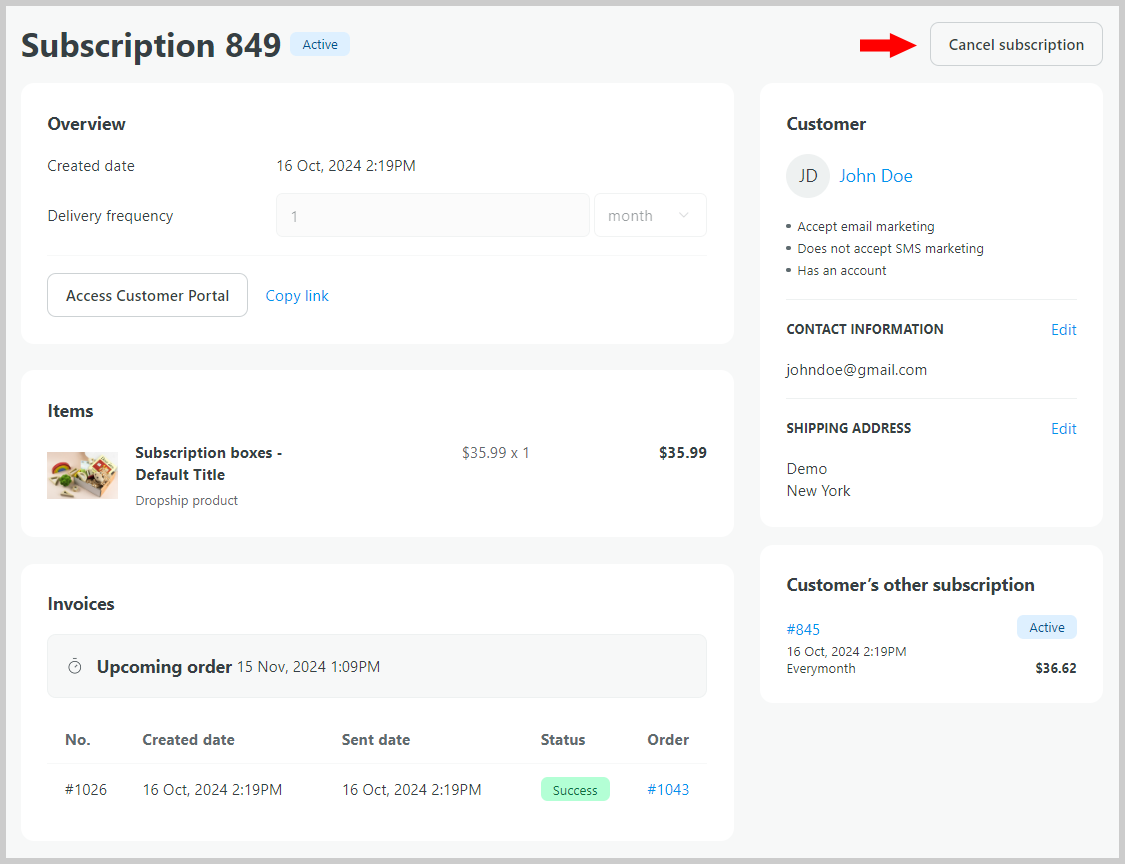
The feature does NOT currently support adjusting the delivery cycle or promotional offers for existing subscription packages.
F. Disable subscription model
If you no longer wish to sell through the subscription model, go to Apps and toggle the switch to disable the Subscription app.
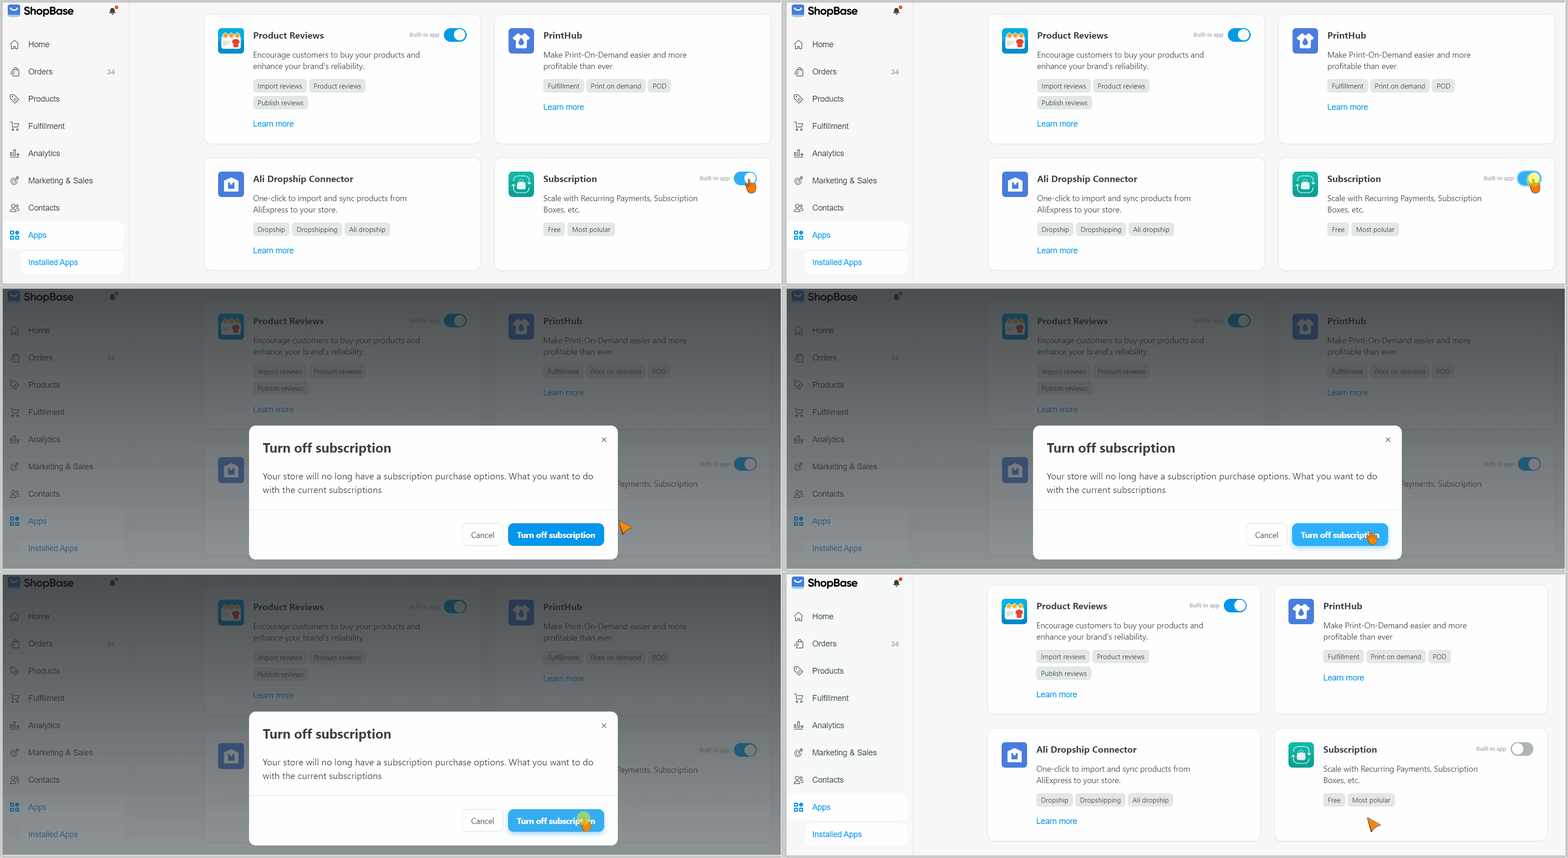
Subscriptions created before the app is disabled will continue to function and charge customers as usual. To cancel these existing subscriptions, navigate to All subscriptions, access each package, and click the Cancel subscription button.
G. Additional notes
When the Subscription app is activated, all products in the store will be sold through a subscription model. The store can only switch back to one-time payment mode after disabling this app.
In cases where the buyer's cart contains products sold under a one-time payment mode (for example, products added to the cart before the Subscription app was activated and left abandoned at checkout), any products added to the cart after the Subscription app is turned on will still be sold under a one-time payment mode.
In cases where the buyer's cart contains products sold under a subscription model (for example, products added to the cart before the Subscription app was turned off and left abandoned at checkout), any products added to the cart after the Subscription app is disabled will still be sold under a subscription model.
Stores using the
Subscription feature can only apply
advanced post-purchase upsell funnels (product suggestions after the customer completes payment), and the system will display an error message when trying to add products from other upsell offers to the cart.
Updated 8 months ago


