Use Counting Tools feature by Conversion Optimizer
Counting Tools is a feature of the Conversion Optimizer application which allows you to display a counter on any page in your store. By using counting tools, customers will feel motivated to make a purchase before products run out of stock or the promotion period is over.
There are 3 types of counting tools: Countdown Timer, Stock Countdown and Real-time Visitors. This article will guide you on how to use and customize Conversion Optimizer's counting tools.
The updated version of Boost Convert - Conversion Optimizer app - will be available for ShopBase stores that are using Theme Version 3.0. If you are using an older theme version, please refer to this article on how to use Countdown Tools feature by Boost Convert.
A. Countdown Timer
B. Stock Countdown
C. Real-time Visitors
You can set a timer countdown for all product pages, or set different timer countdowns for different products. The meter will be displayed on the product page as shown below.

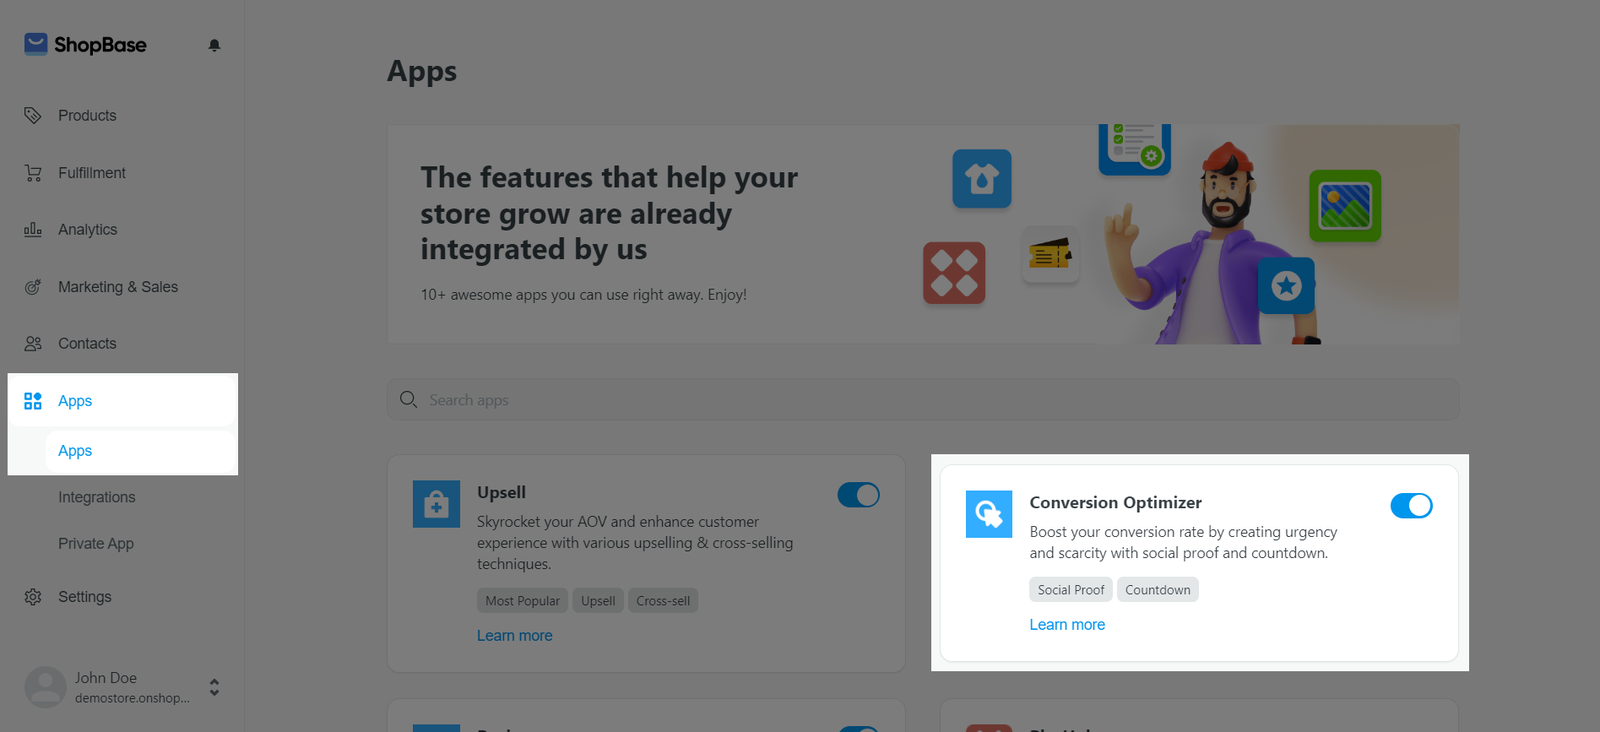
From your ShopBase admin, go to Apps > App > Conversion Optimizer. You can also access the Conversion Optimizer app by going to Marketing & Sales > Conversion Optimizer.
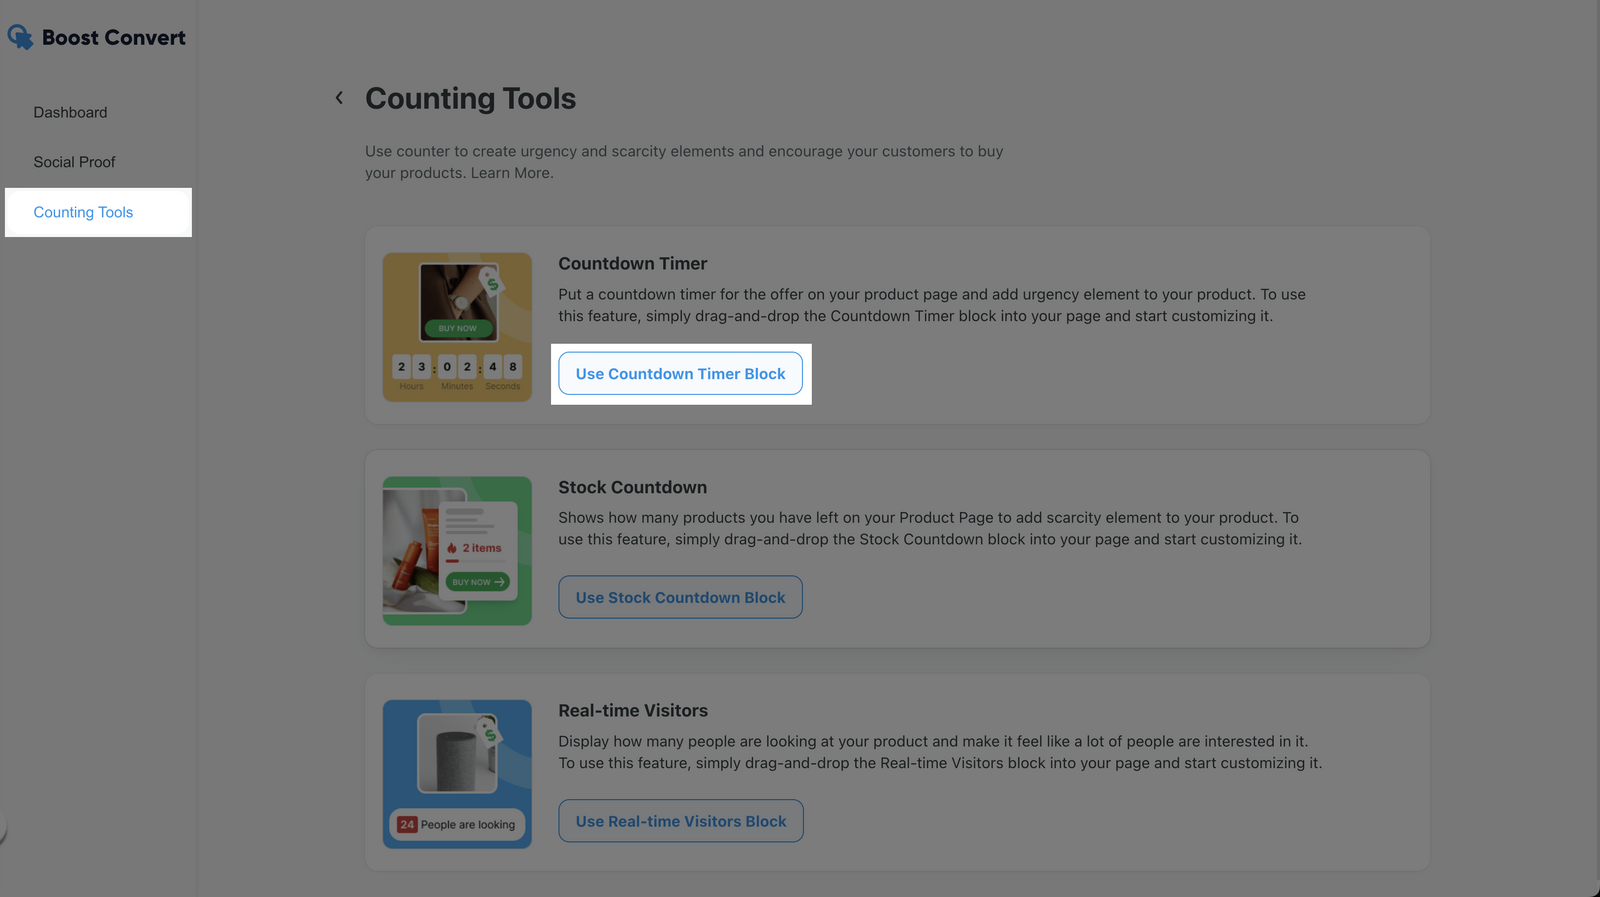
In Counting tools, select Use Countdown Timer Block.
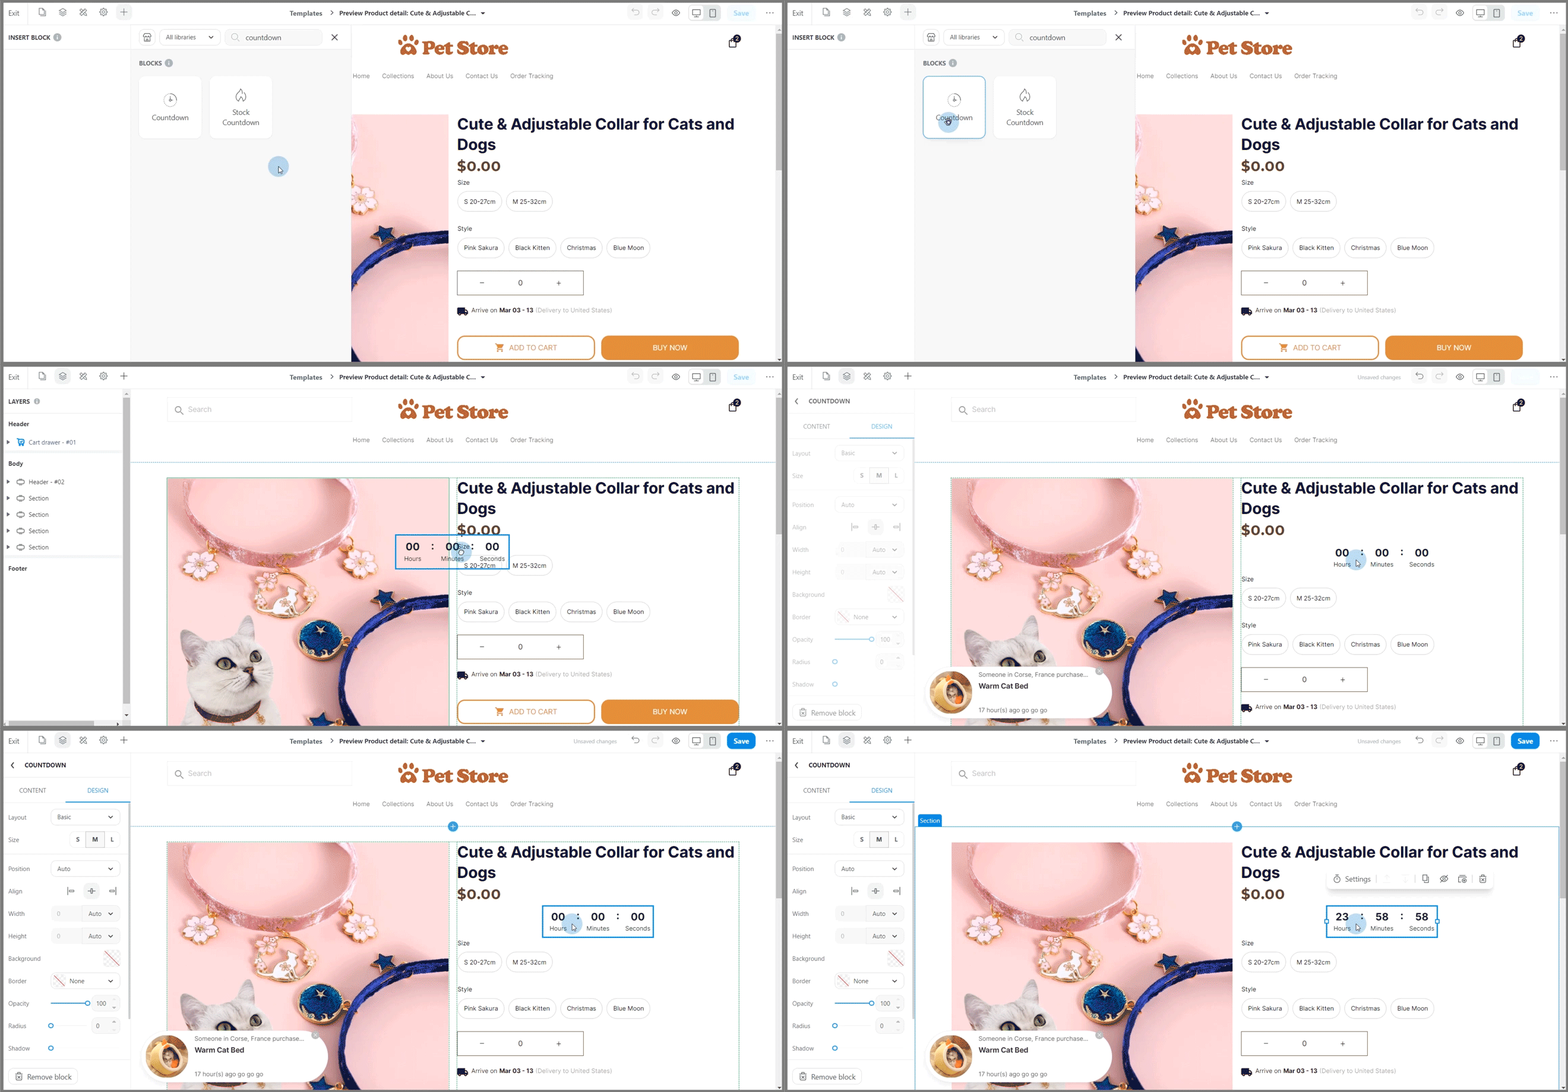
The system will direct you to the Website Builder of your product page. Here, you can drag and drop the Countdown block from the Insert panel to the desired position on your page. Then, you can edit the Content and Design of your block.
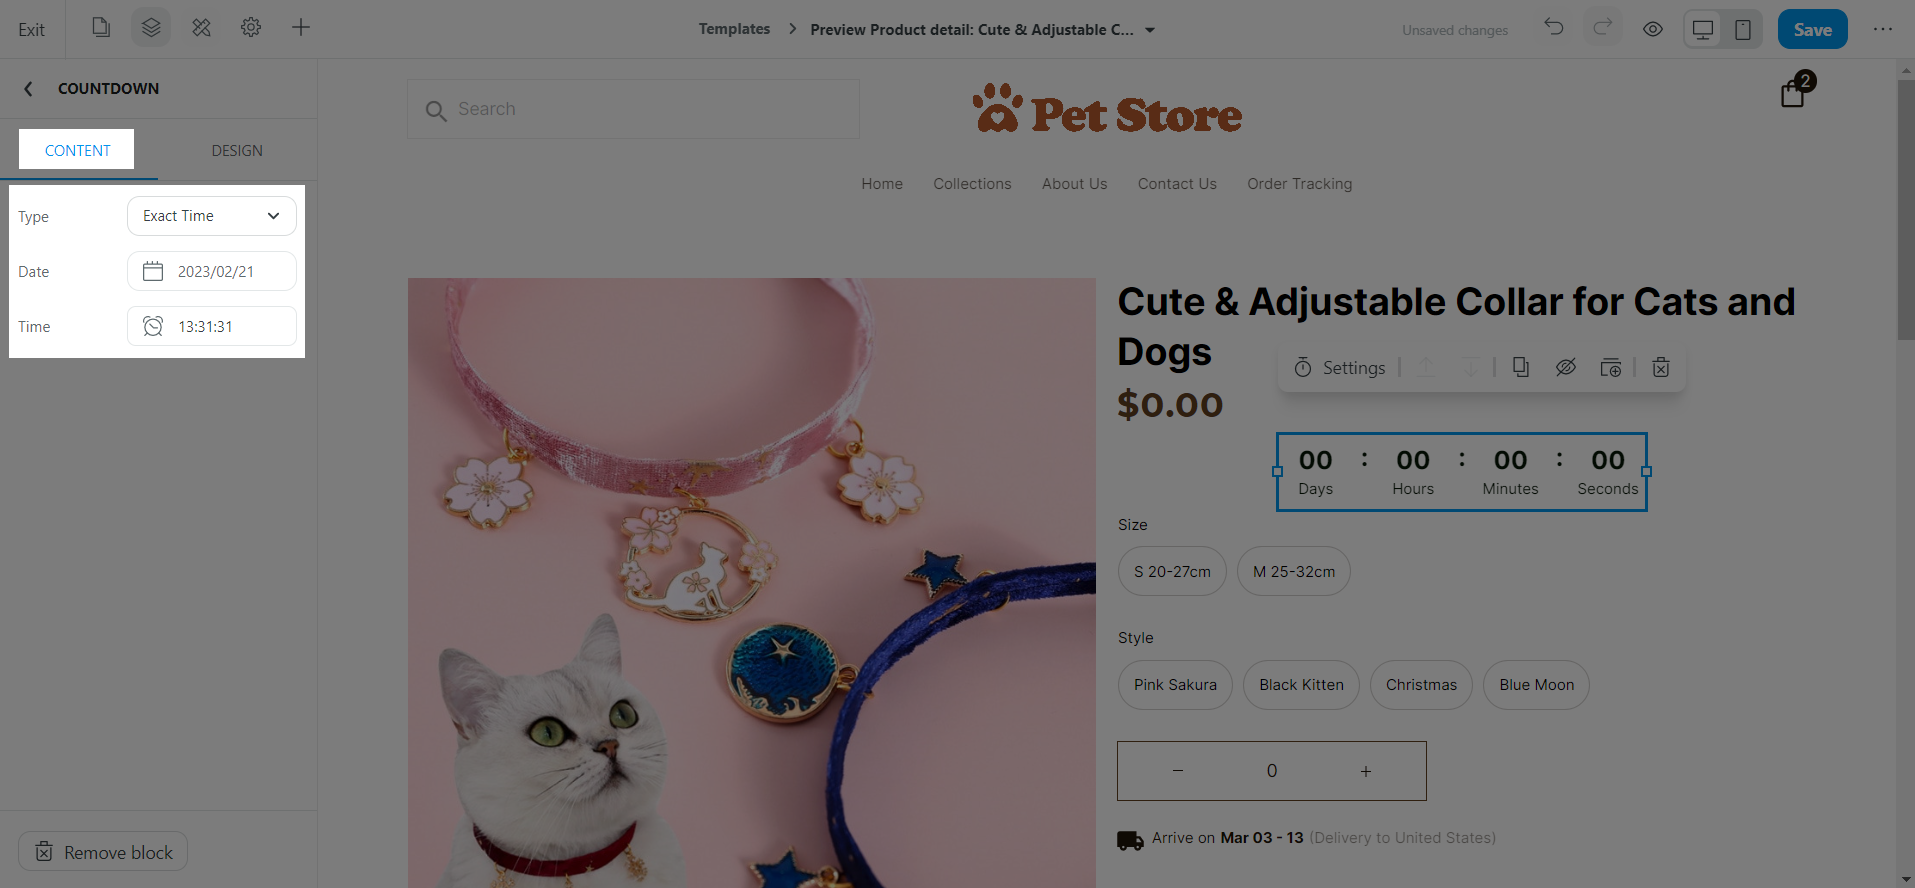
In Content, you can set up 2 countdown types:
Exact time: Select a specific Date and Time for the countdown.
Custom: Enter a certain number of hour and minute for the countdown. You can also set up for the countdown to restart when the page is loaded or the countdown ends.
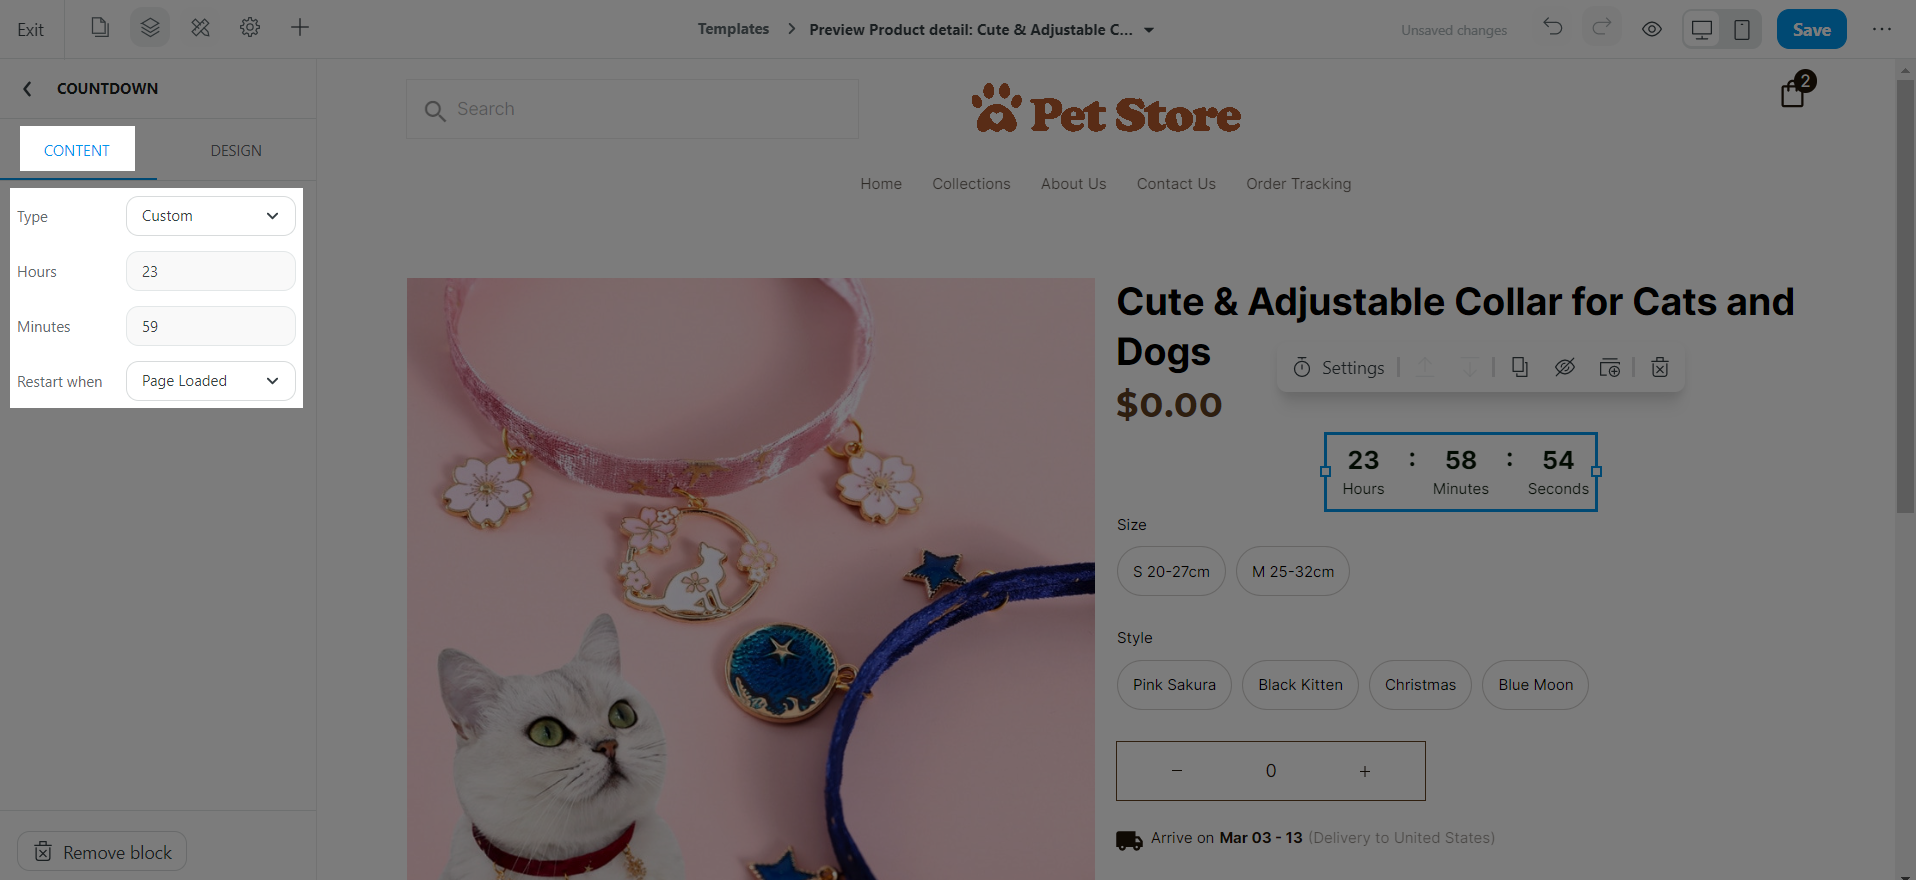
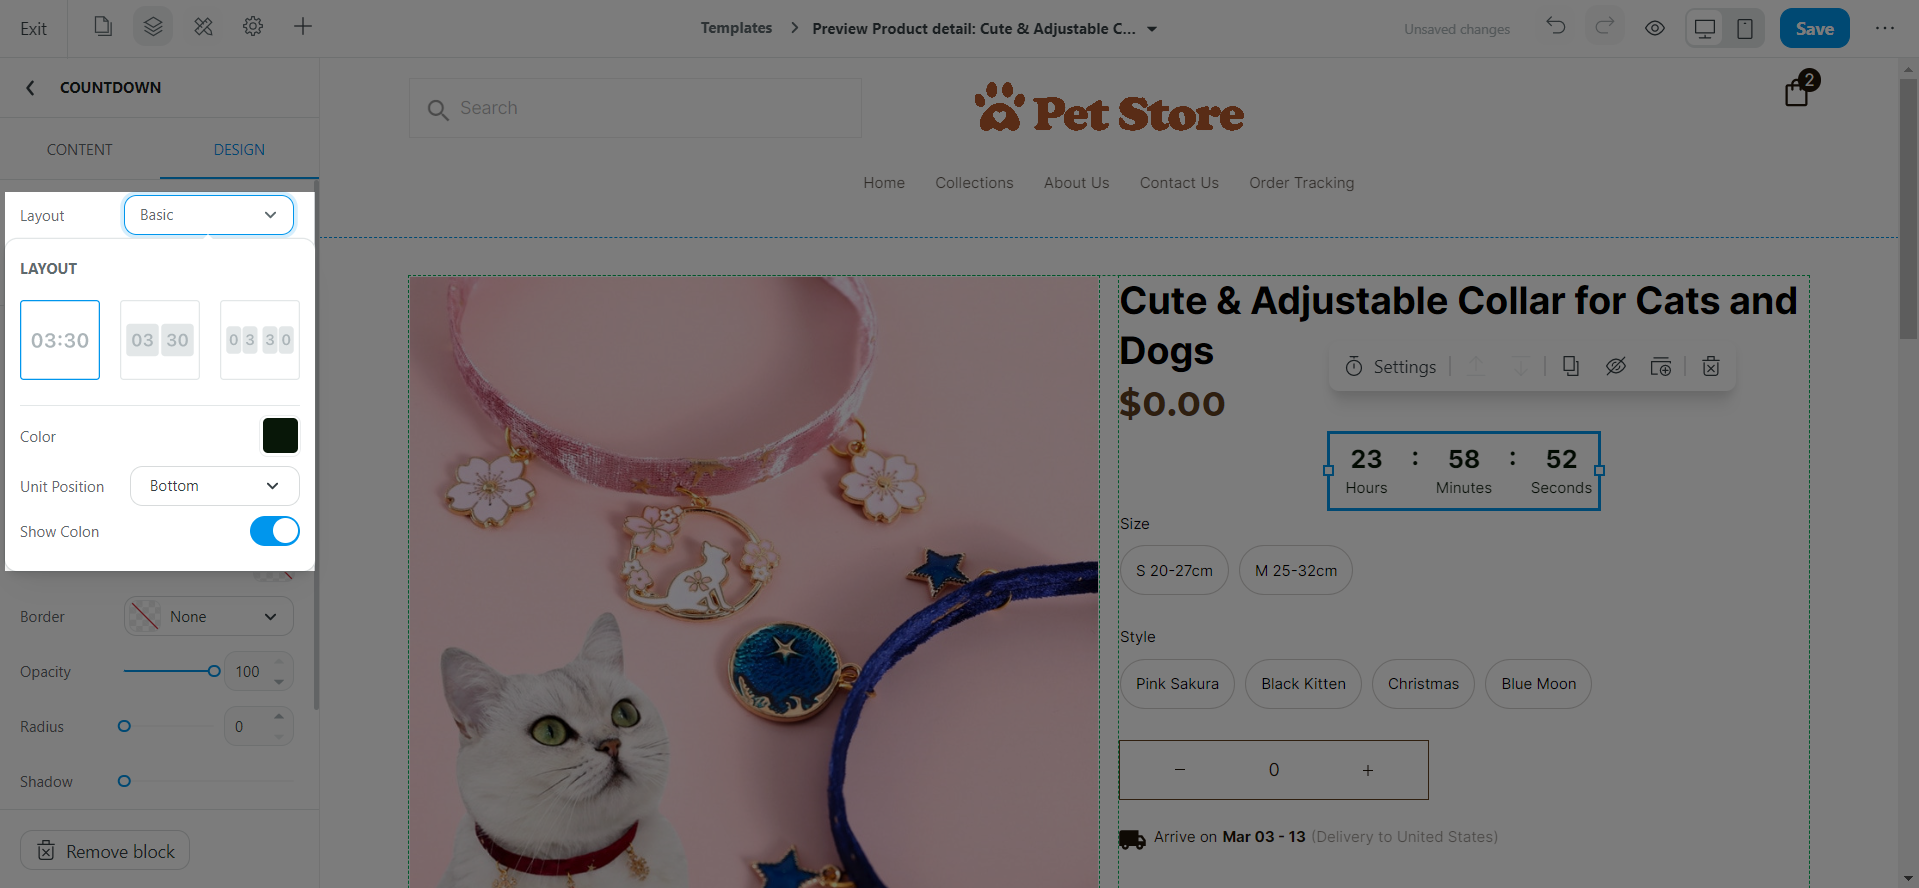
In Design, you can customize the block's position, alignment, width, height, etc. just like other blocks on your web page. Specifically for the Countdown block, you can set up its Layout and Position.
In Layout:
Layout: Select among Basic, Double highlight, and Single highlight layout.
Text color/Color: Select the colors for your block.
Unit position: Choose where you want the time units to appear.
Show color: Select to show or hide the colon between the time unit.
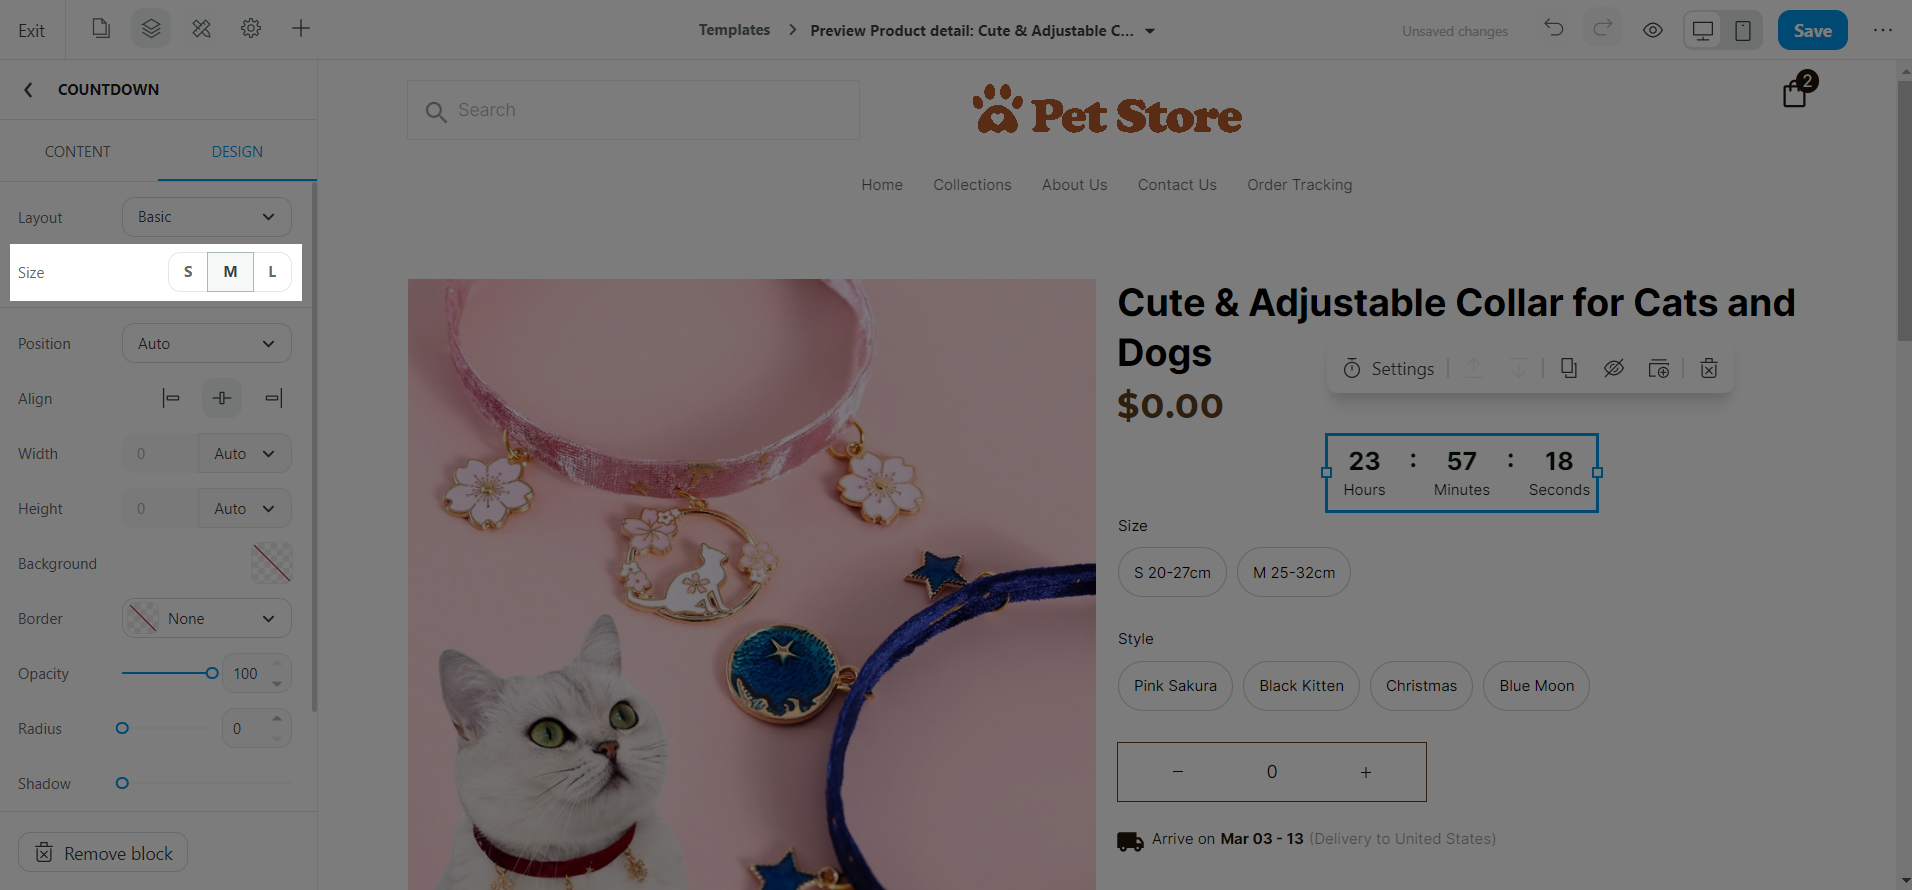
In Size, select to display the block in small, medium, or large.
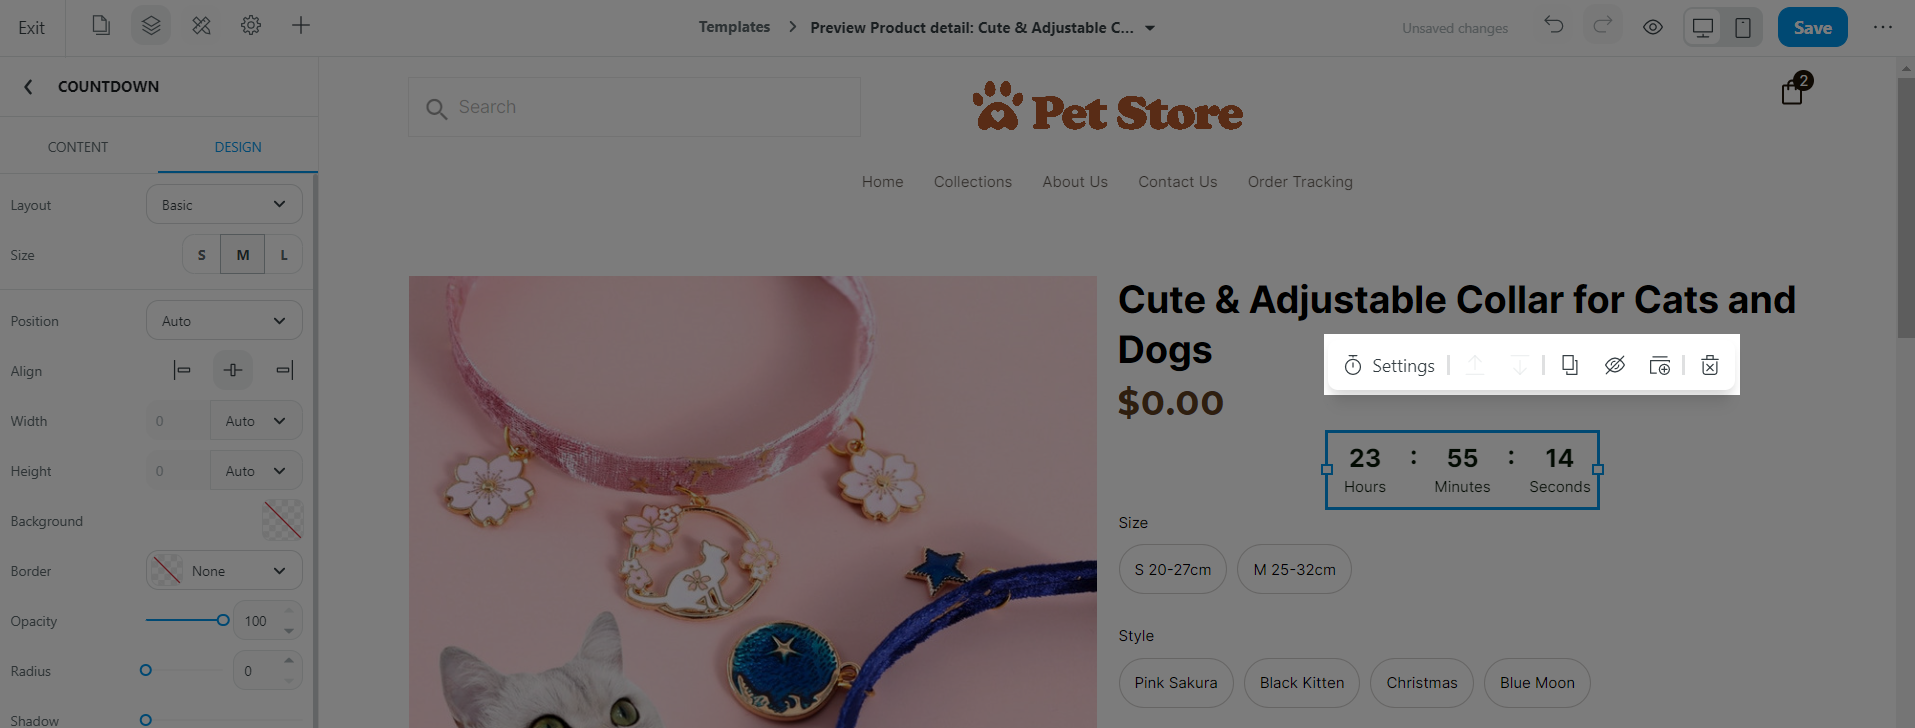
In the Quick bar settings, you can quickly edit your block:
Click Settings to edit the block's Content and Design.
Duplicate the block.
Hide the block.
Save the block as a template for later use.
Delete the block.
Click Save once you finished.
When enabled, the feature adds a progress bar on your product pages to show the number of products remaining. The product countdown will be displayed as below.
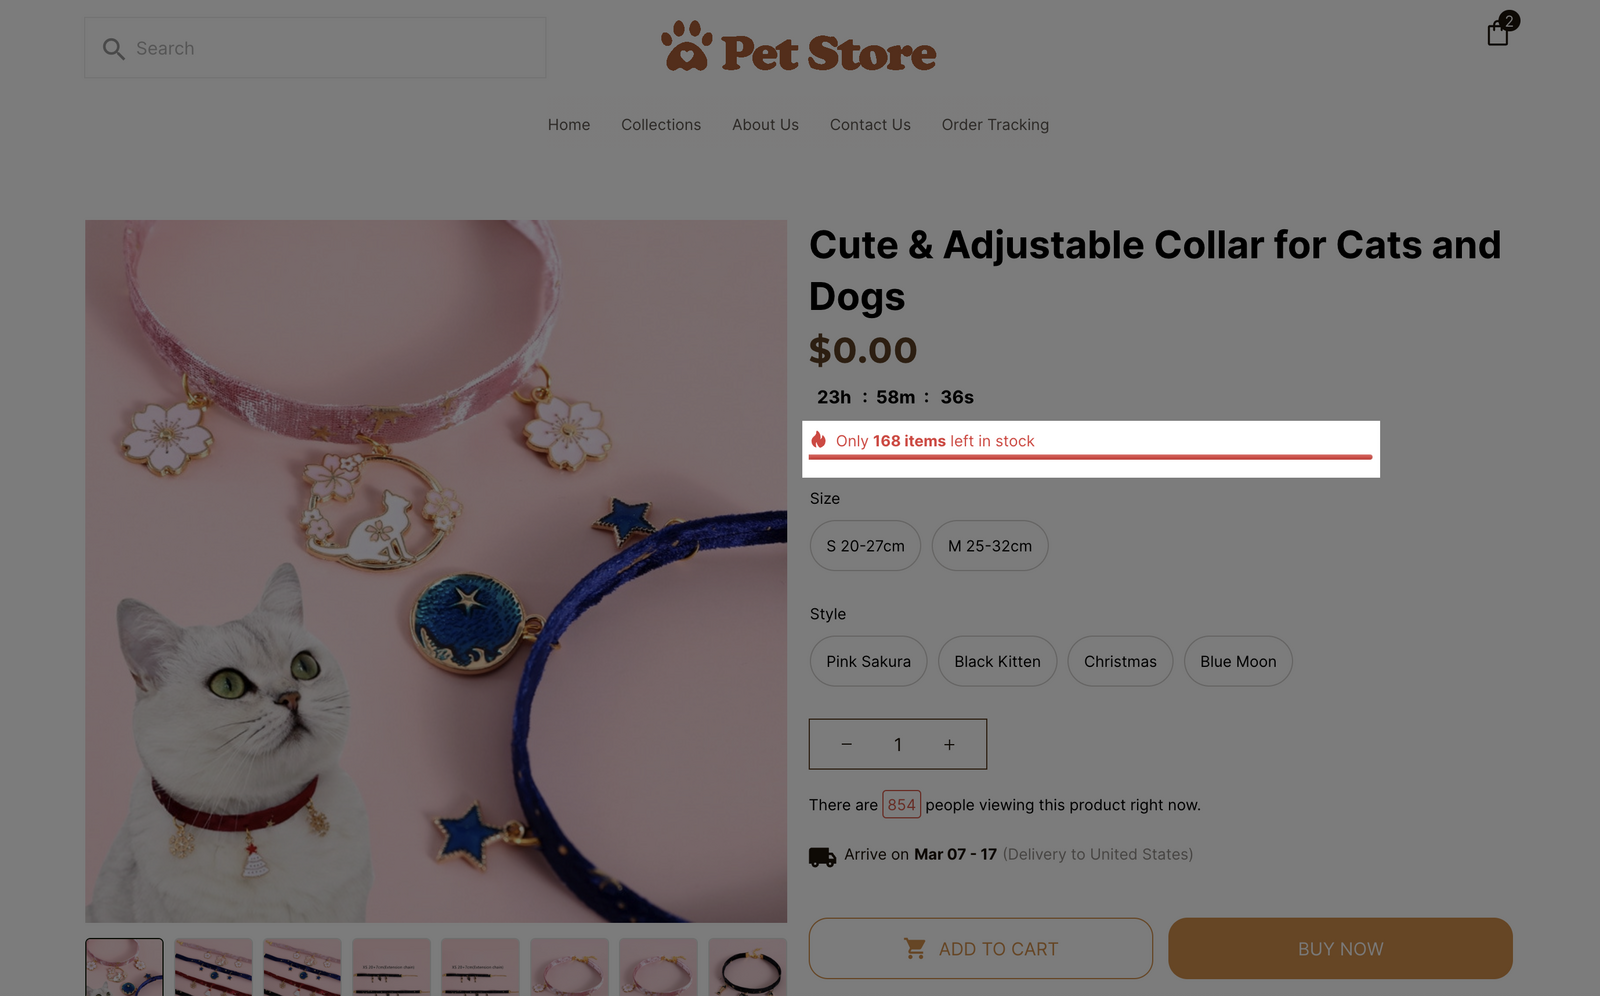
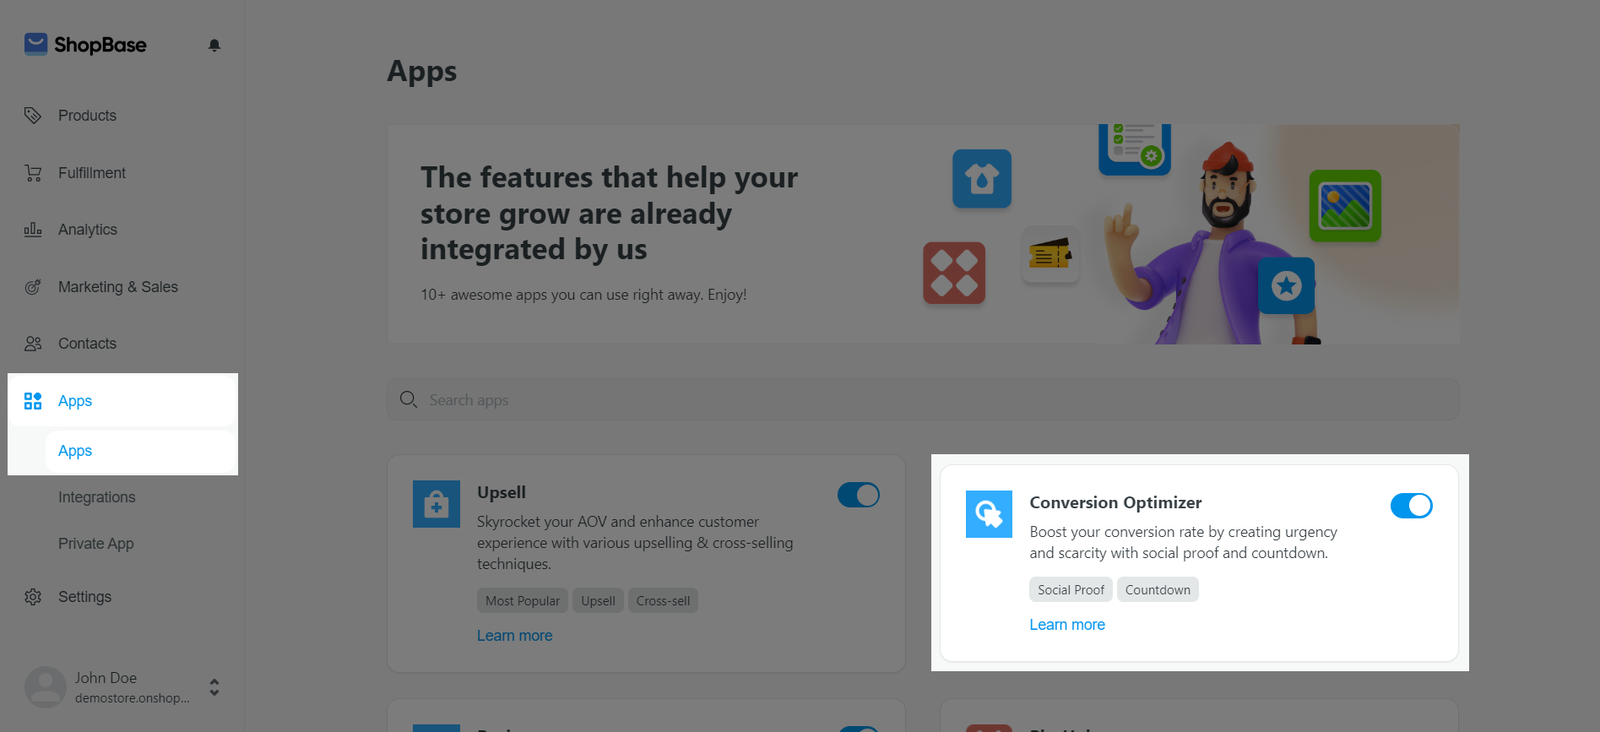
From your ShopBase admin, go to Apps > App > Conversion Optimizer. You can also access the Conversion Optimizer app by going to Marketing & Sales > Conversion Optimizer.
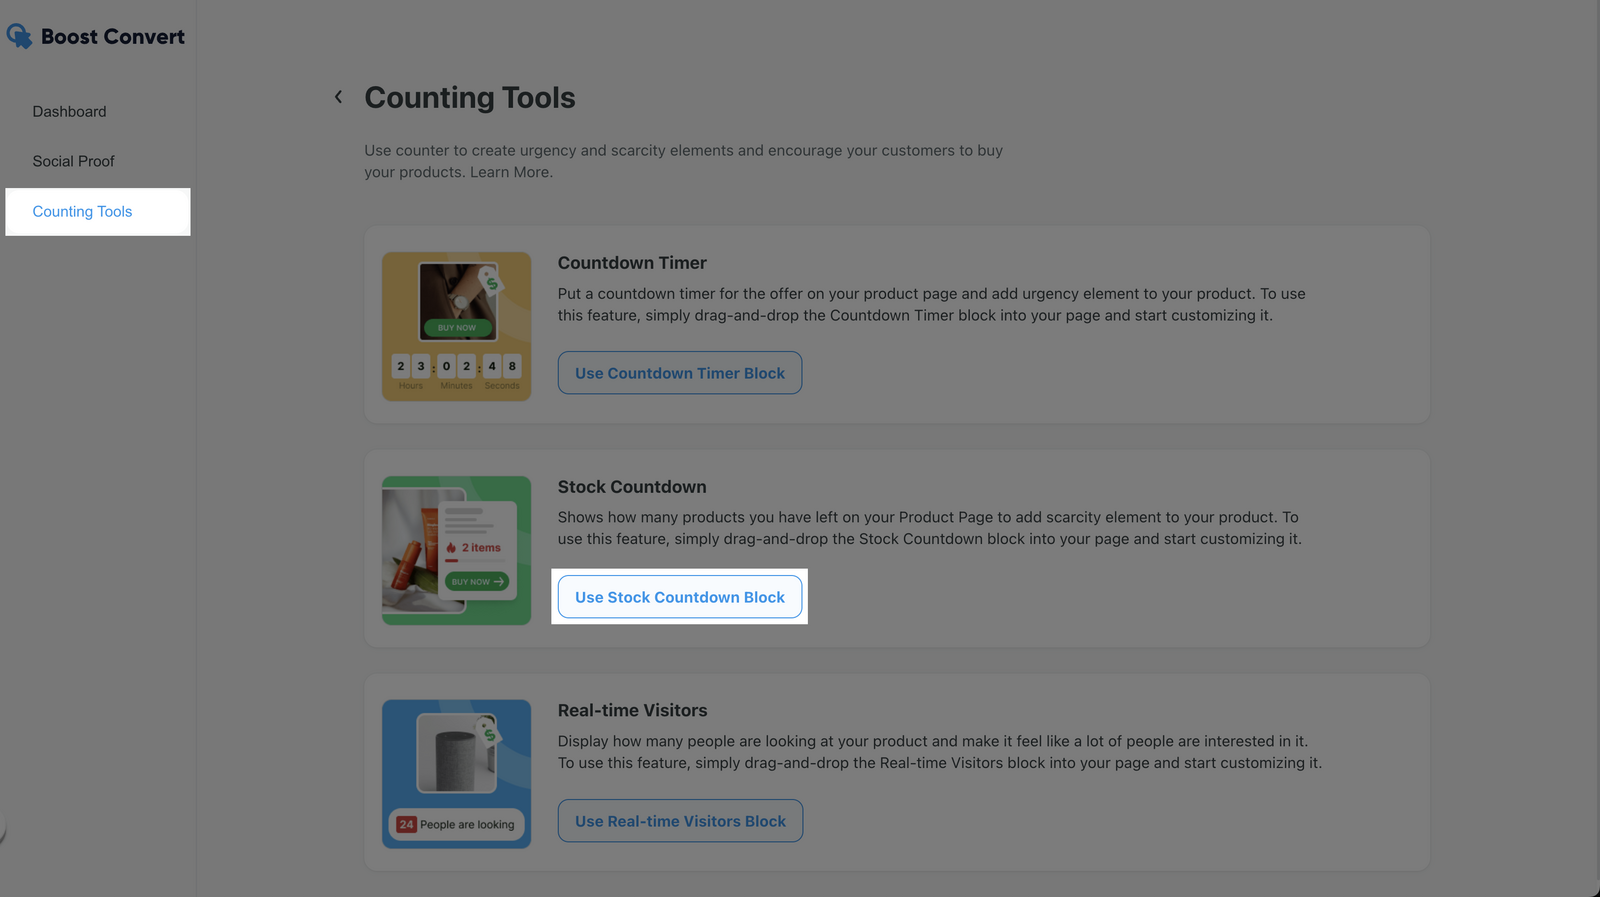
In Counting tools, select Use Stock Countdown Block.
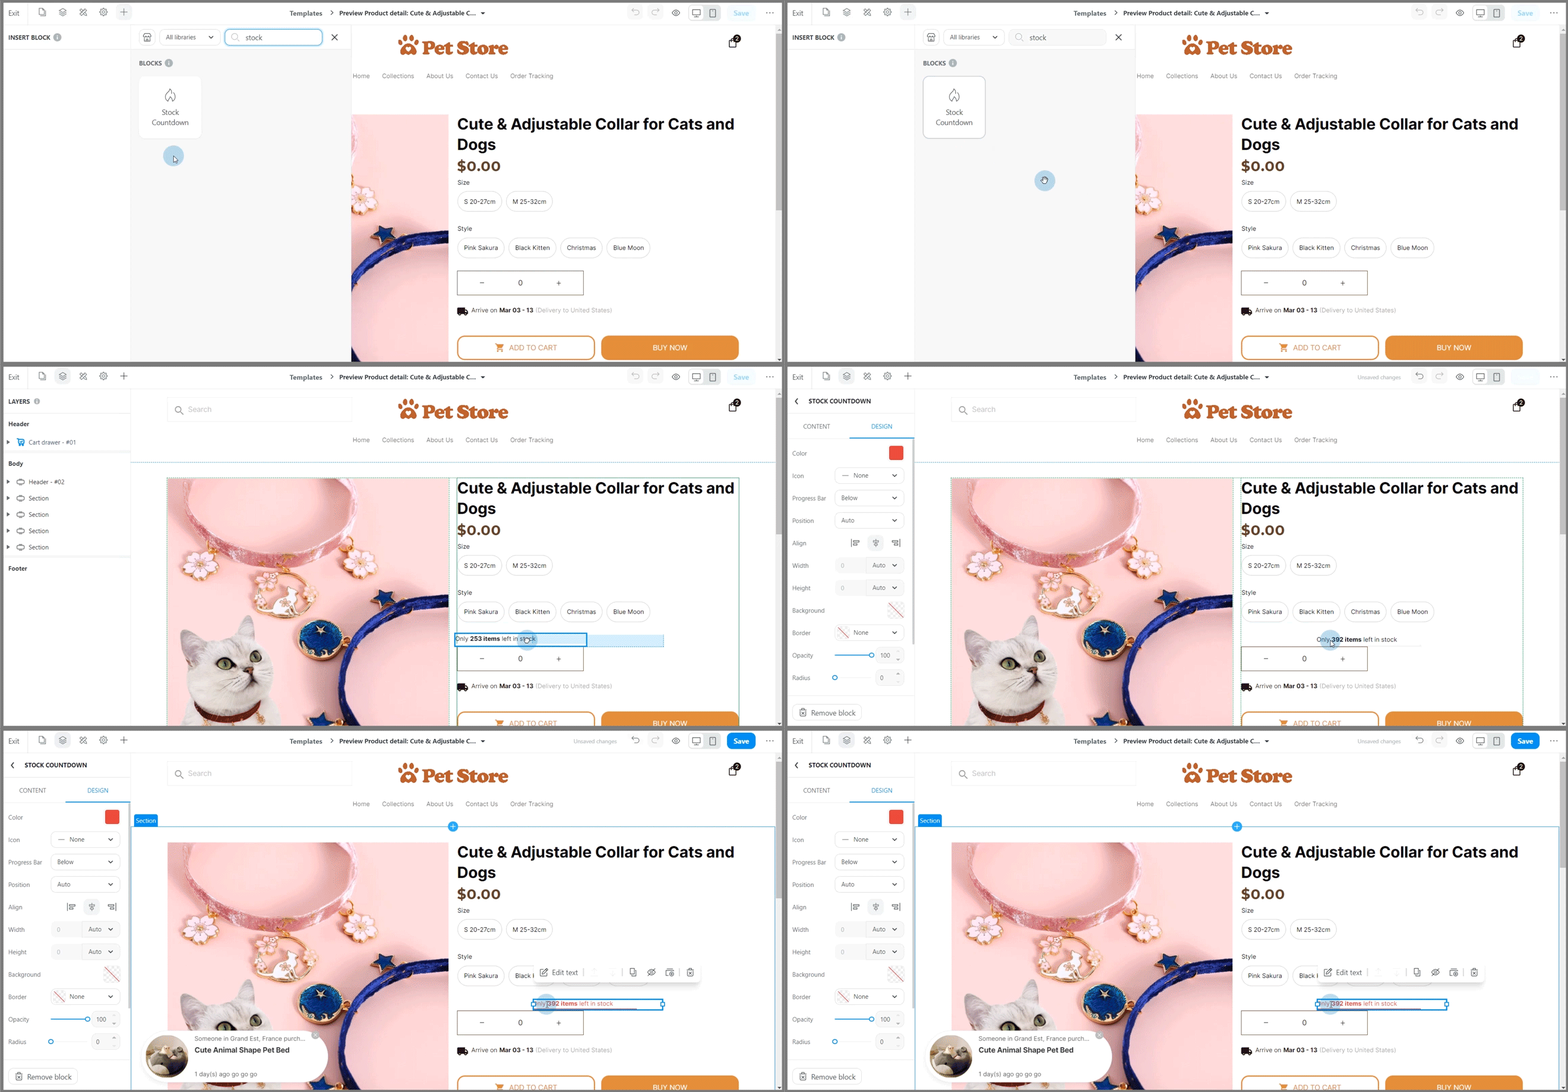
The system will direct you to the Website Builder of your product page. Here, you can drag and drop the Stock Countdown block from the Insert panel to the desired position on your page. Then, you can edit the Content and Design of your block.
In Content, you can select to show the Actual stock number recorded in your product inventory, or a random number between a range of your choice.
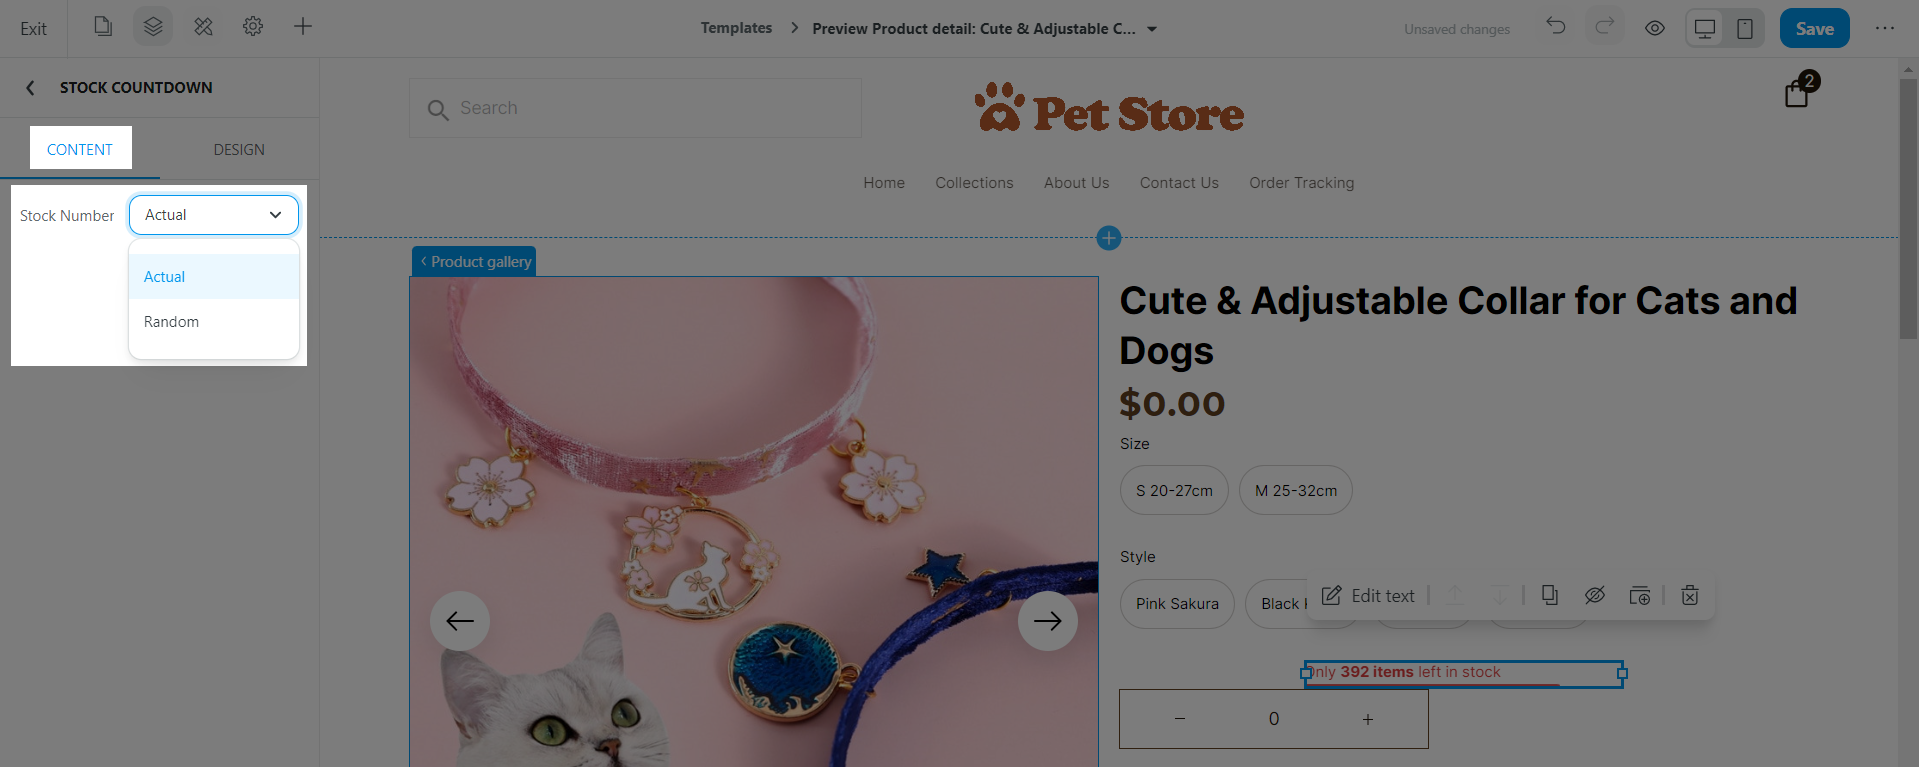
In Design, you can customize the block's position, alignment, width, height, etc. just like other blocks on your web page. Specifically for the Stock Countdown block, you can set up its Color, Icon, and position of the Progress Bar.
In the Quick bar settings, you can quickly edit your block:
Click Settings to edit the block's Content and Design.
Duplicate the block.
Hide the block.
Save the block as a template for later use.
Delete the block.
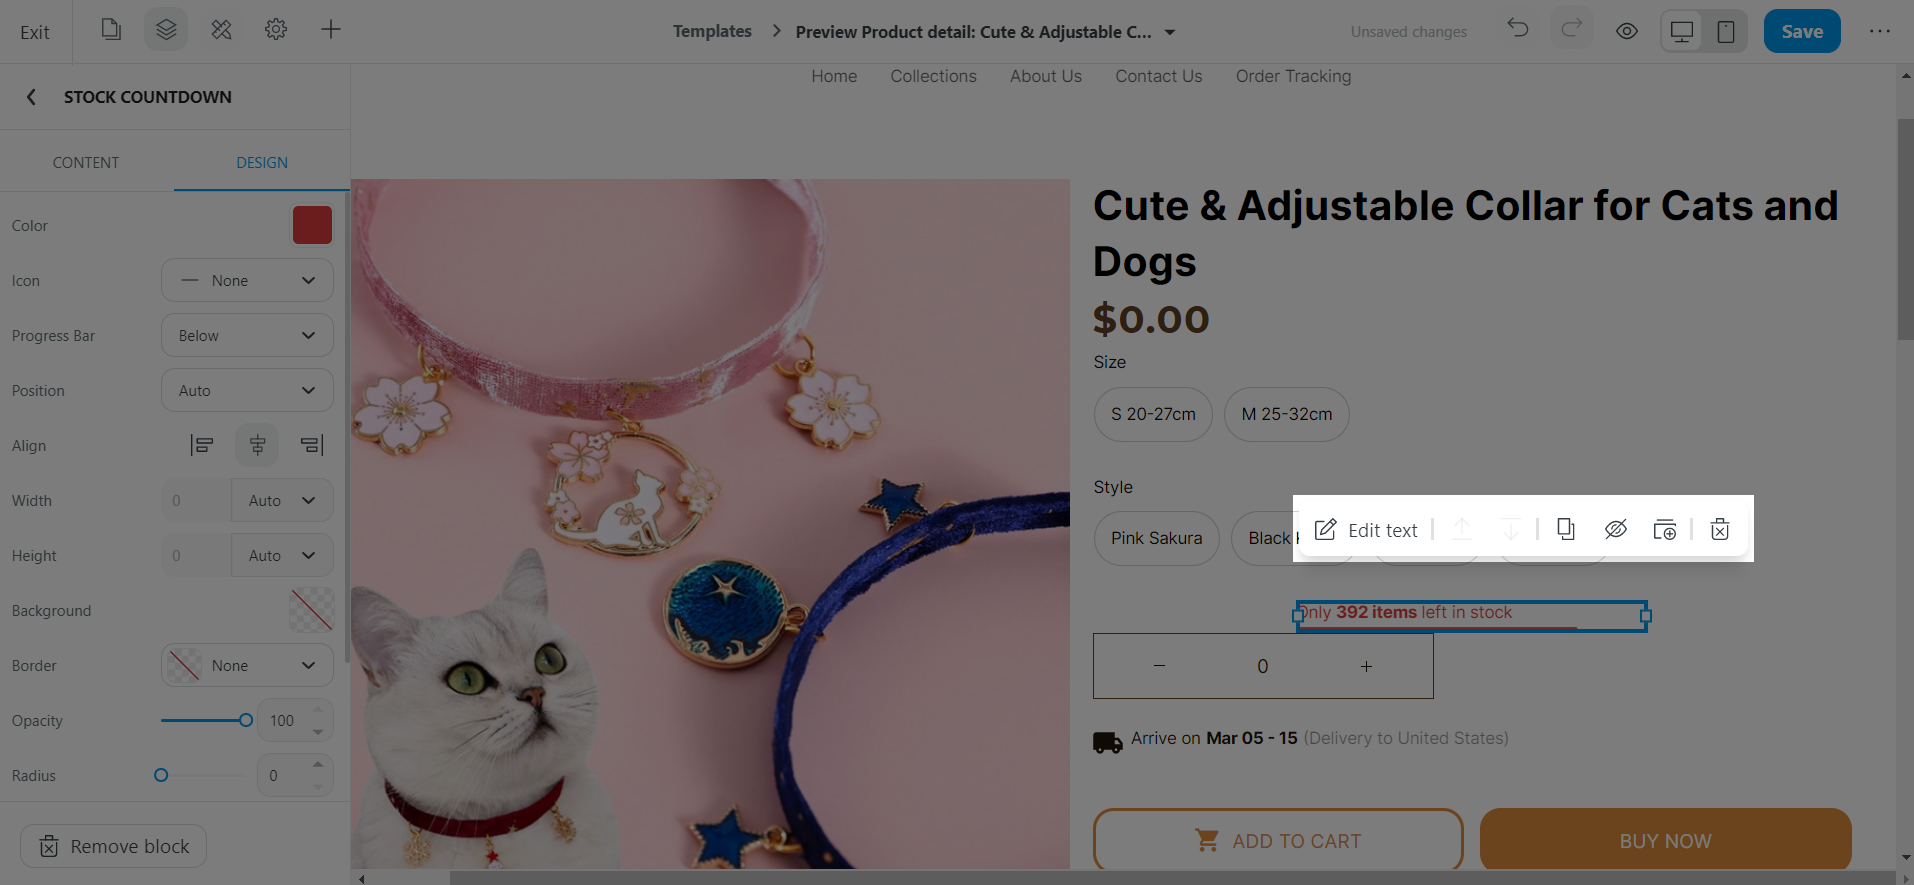
Click Save to finish.
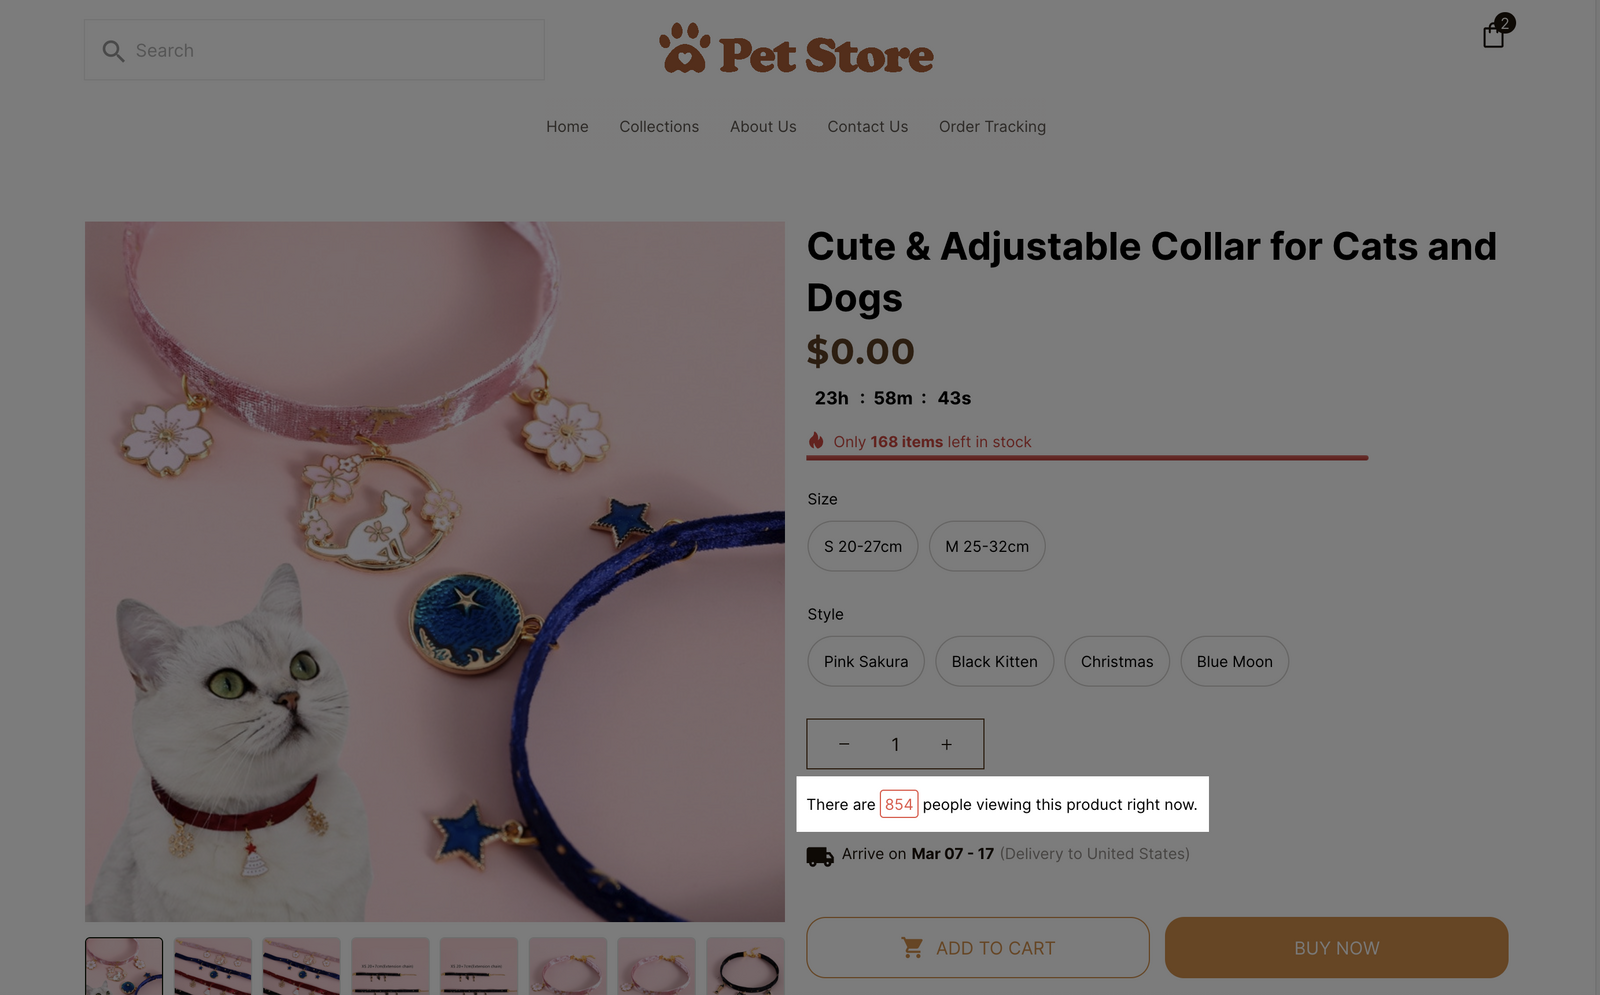
You can enable this feature to shows a counter of the number of visitors currently viewing the product page to create scarcity and encourage customer to make a purchase. The counter will be displayed as below.
From your ShopBase admin, go to Apps > App > Conversion Optimizer. You can also access the Conversion Optimizer app by going to Marketing & Sales > Conversion Optimizer.
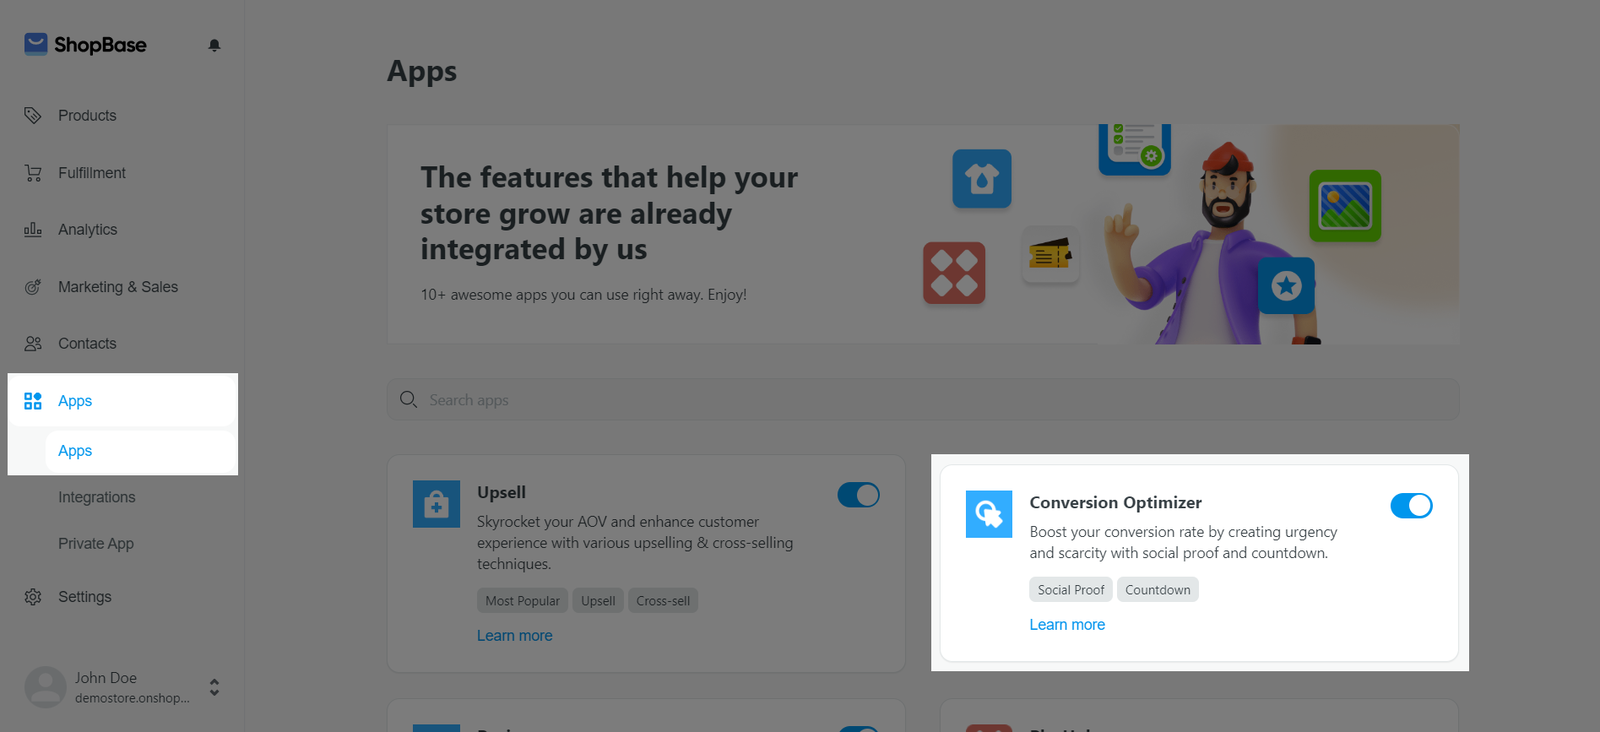
In Counting tools, select Use Real-time Visitors Block.
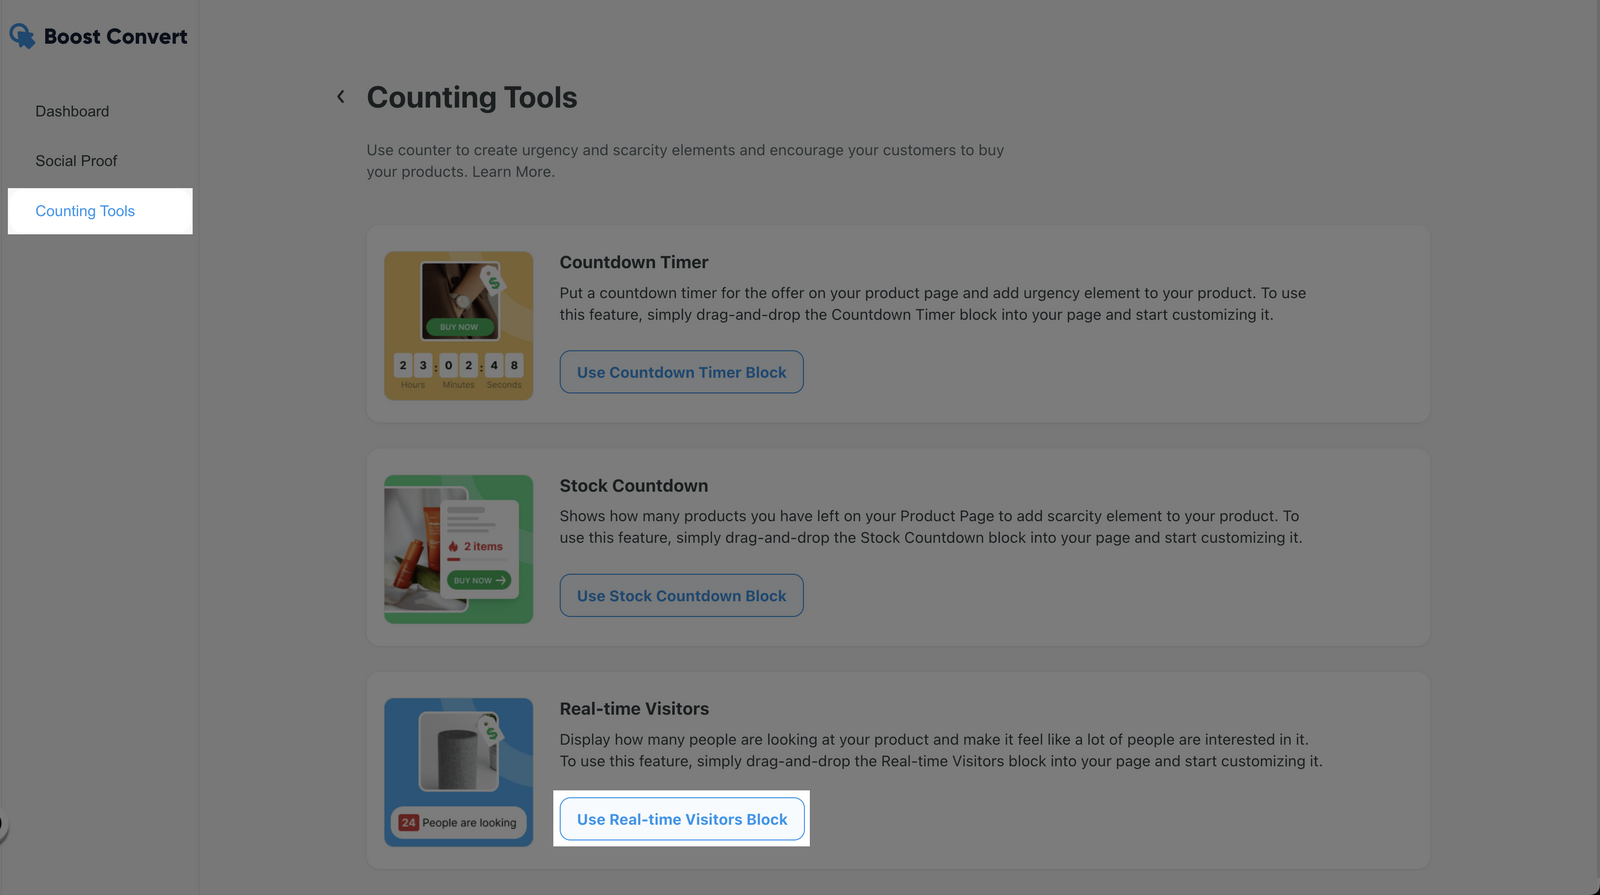
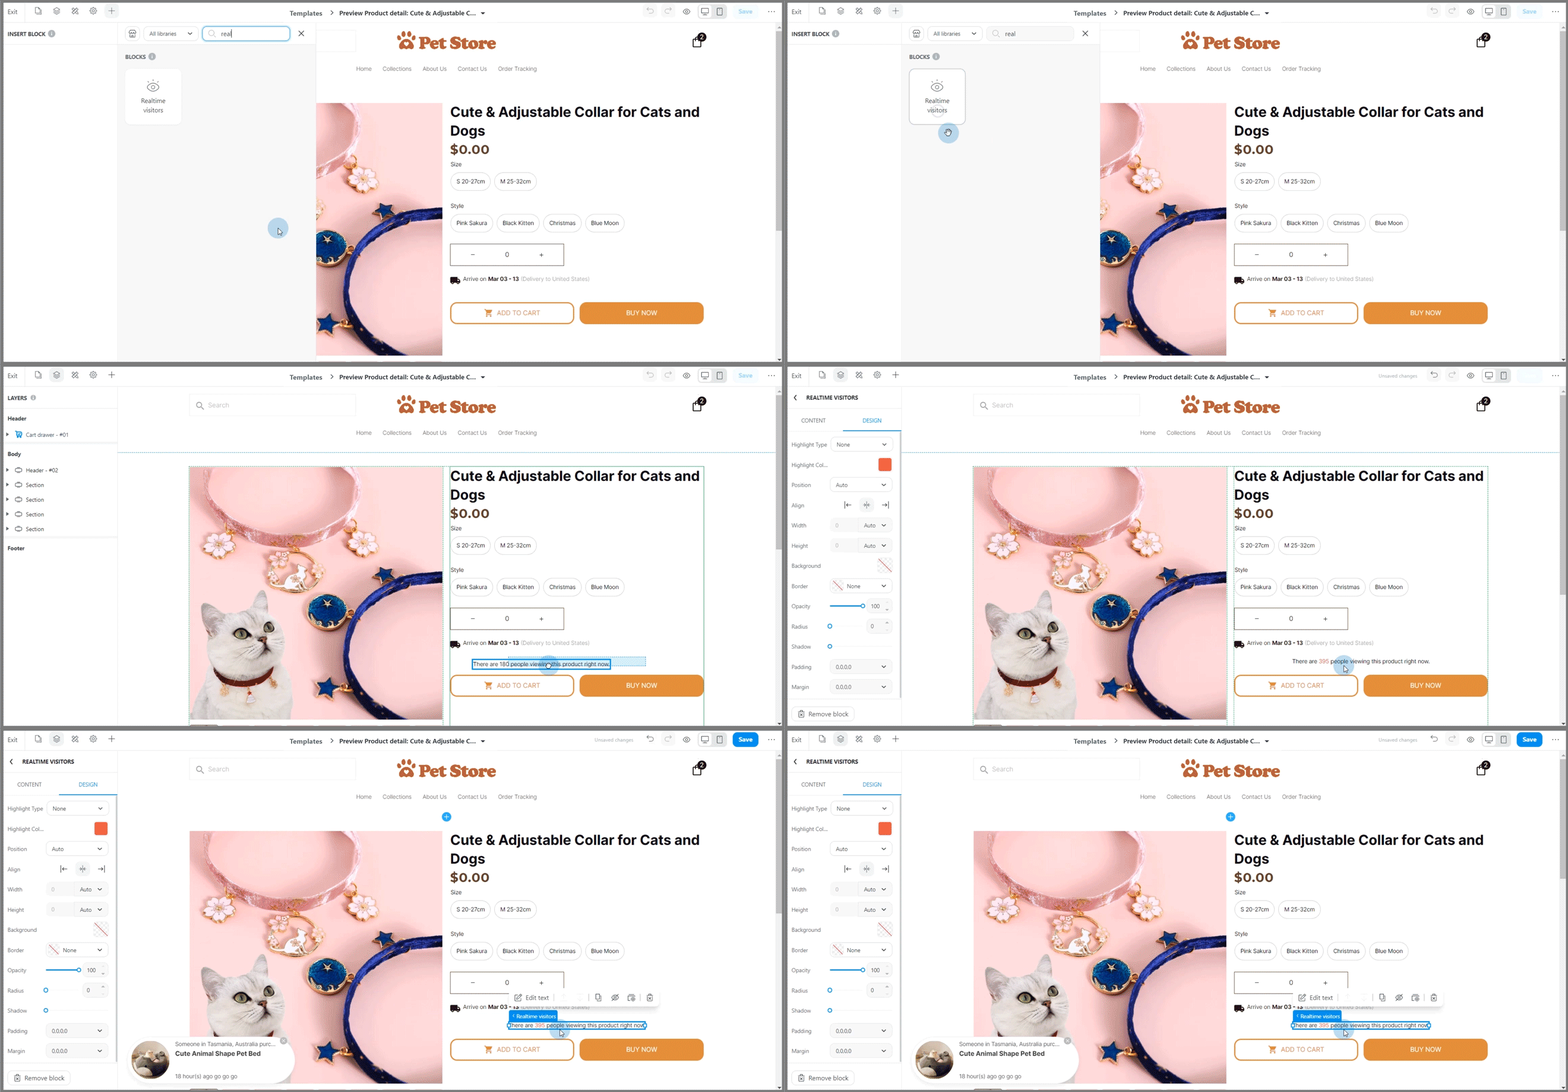
The system will direct you to the Website Builder of your product page. Here, you can drag and drop the Realtime visitors block from the Insert panel to the desired position on your page. Then, you can edit the Content and Design of your block.
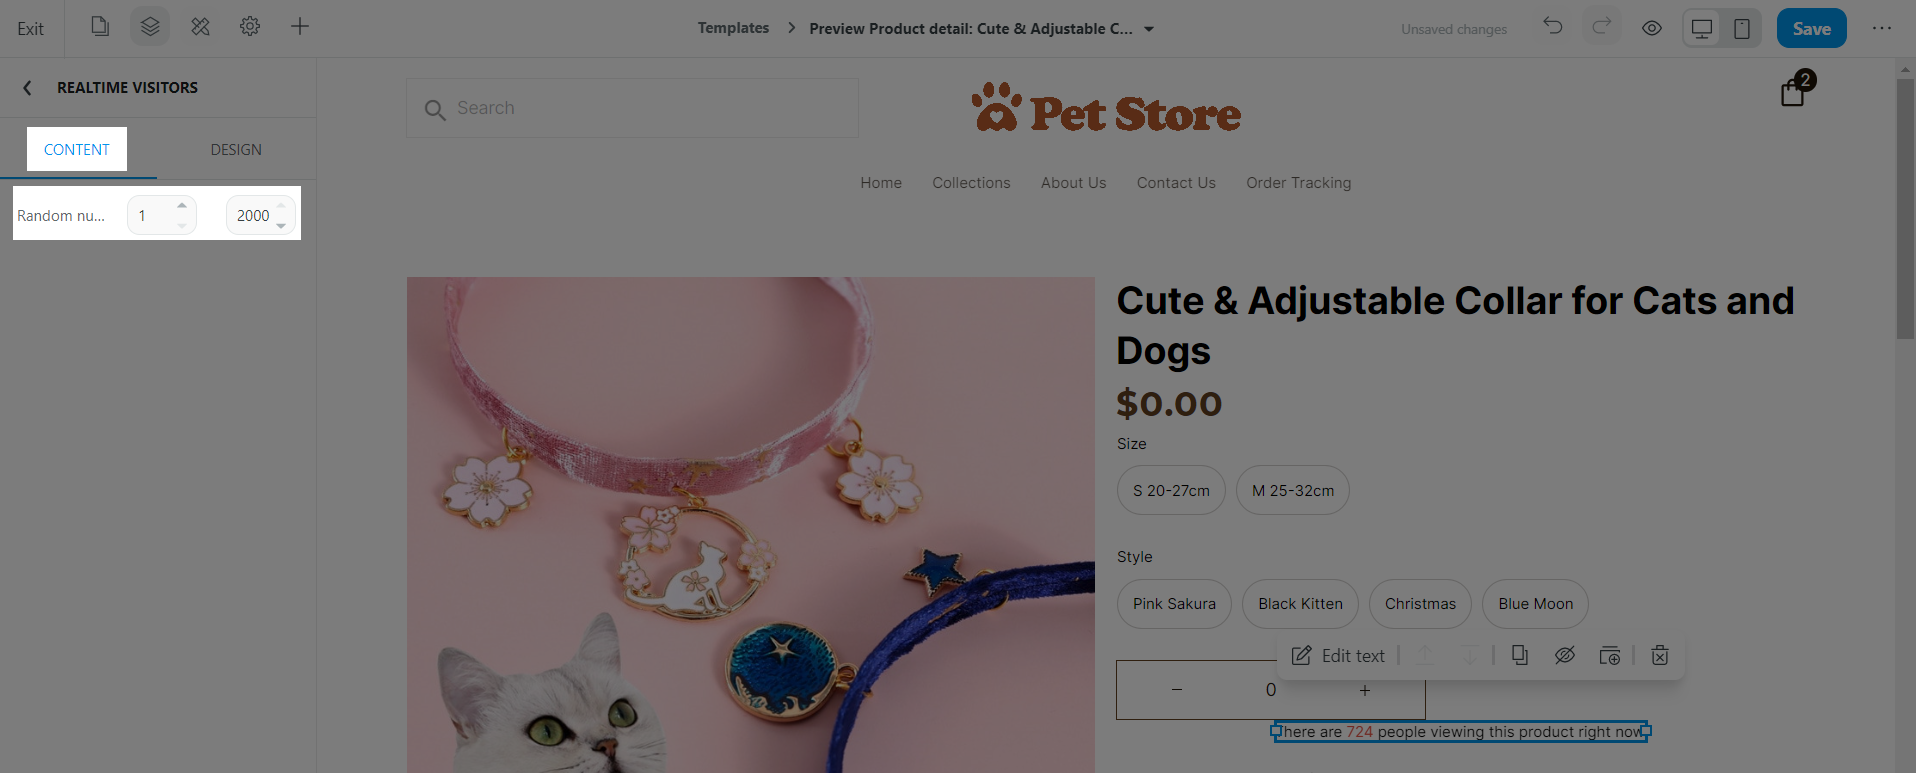
In Content, you can select to show a random number between a range of your choice.
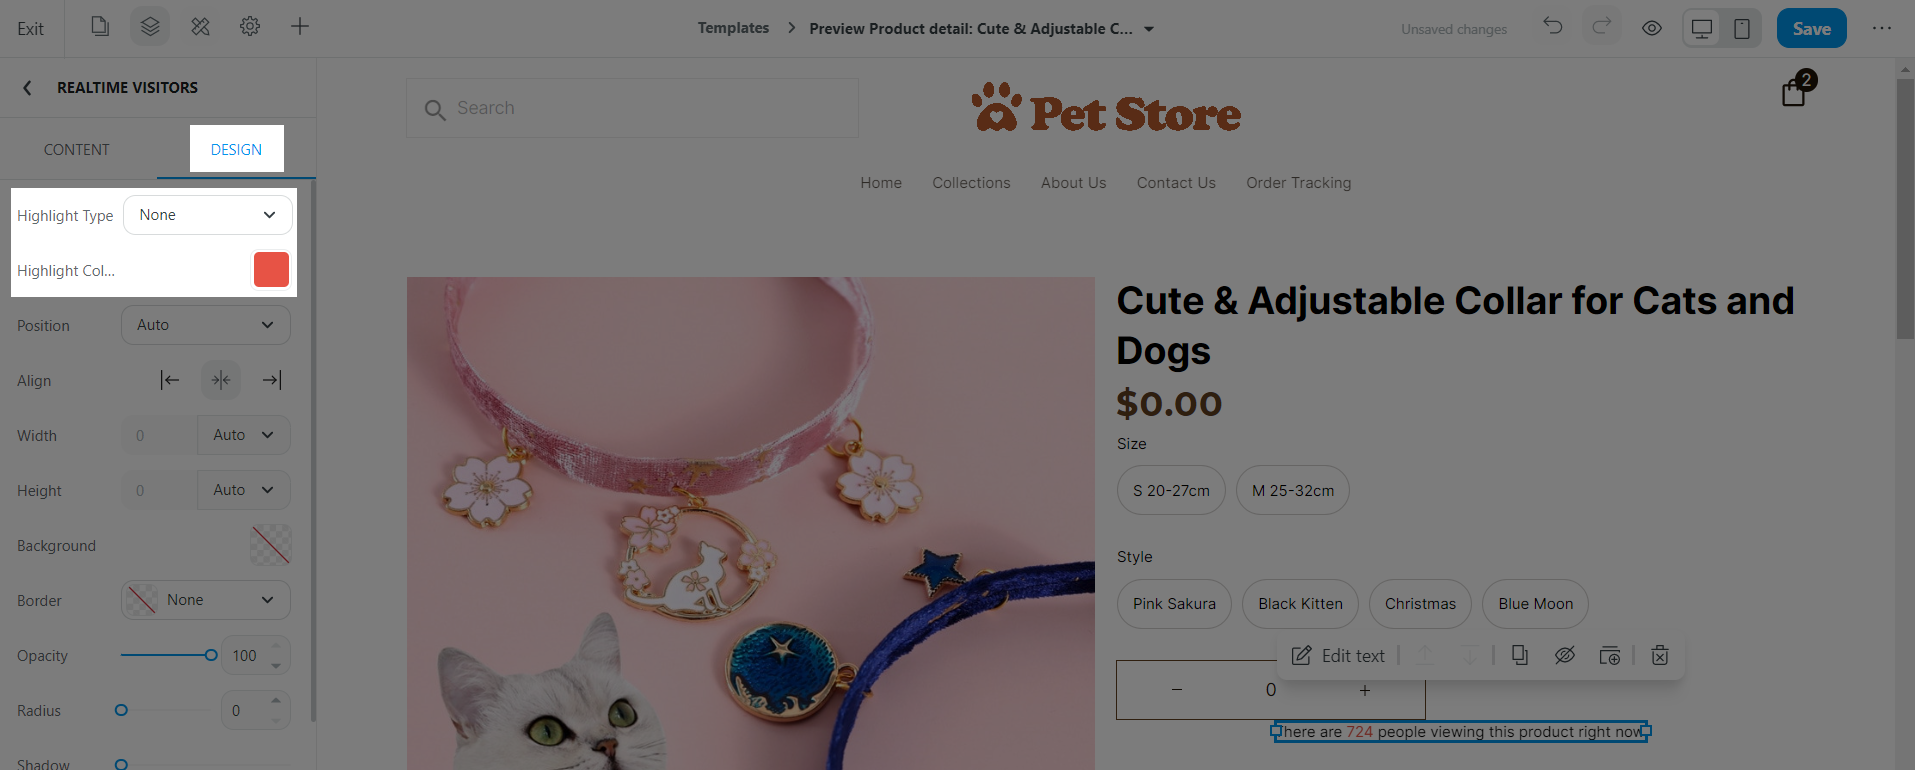
In Design, you can customize the block's position, alignment, width, height, etc. just like other blocks on your web page. Specifically for the Realtime visitors block, you can set up its Highlight Type, and Highlight Color.
In the Quick bar settings, you can quickly edit your block:
Click Settings to edit the block's Content and Design.
Duplicate the block.
Hide the block.
Save the block as a template for later use.
Delete the block.
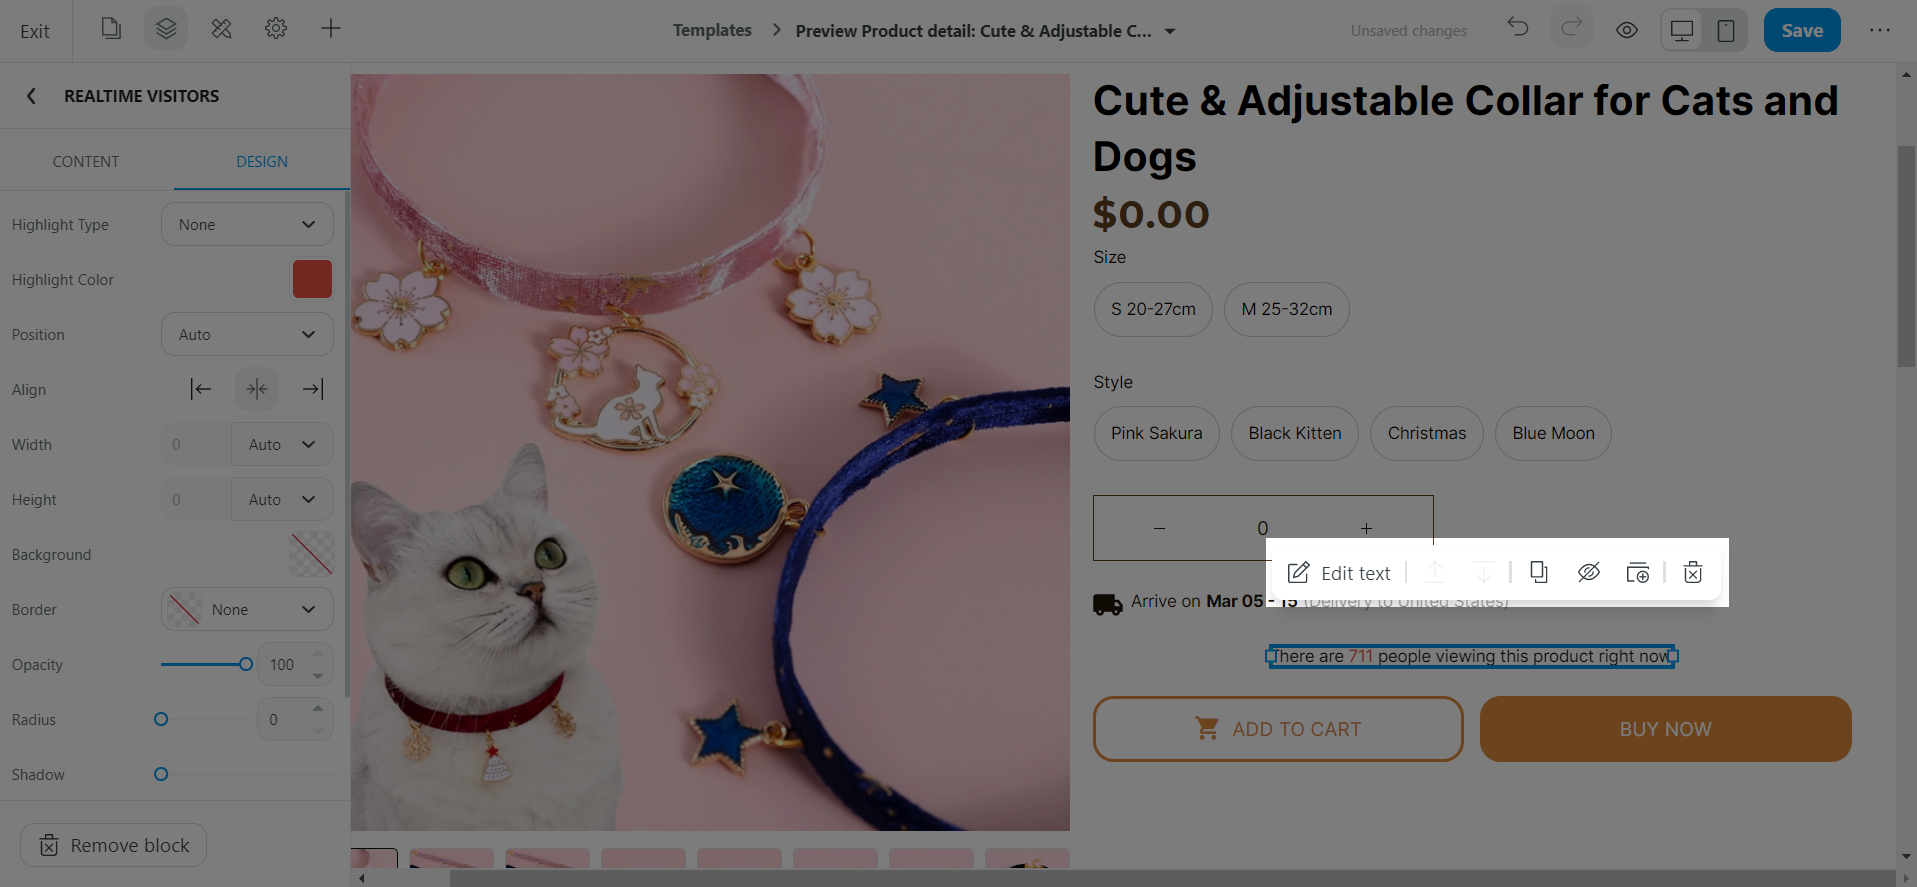
Click Save to finish.
Overview of Conversion Optimizer App
Use Social Proof feature by Conversion Optimizer
Set up Social Proof notification display on Conversion Optimizer
Use Counting Tools feature by Conversion Optimizer
There are 3 types of counting tools: Countdown Timer, Stock Countdown and Real-time Visitors. This article will guide you on how to use and customize Conversion Optimizer's counting tools.
The updated version of Boost Convert - Conversion Optimizer app - will be available for ShopBase stores that are using Theme Version 3.0. If you are using an older theme version, please refer to this article on how to use Countdown Tools feature by Boost Convert.
In this article
A. Countdown Timer
B. Stock Countdown
C. Real-time Visitors
A. Countdown Timer
You can set a timer countdown for all product pages, or set different timer countdowns for different products. The meter will be displayed on the product page as shown below.
From your ShopBase admin, go to Apps > App > Conversion Optimizer. You can also access the Conversion Optimizer app by going to Marketing & Sales > Conversion Optimizer.
In Counting tools, select Use Countdown Timer Block.
The system will direct you to the Website Builder of your product page. Here, you can drag and drop the Countdown block from the Insert panel to the desired position on your page. Then, you can edit the Content and Design of your block.
In Content, you can set up 2 countdown types:
Exact time: Select a specific Date and Time for the countdown.
Custom: Enter a certain number of hour and minute for the countdown. You can also set up for the countdown to restart when the page is loaded or the countdown ends.
In Design, you can customize the block's position, alignment, width, height, etc. just like other blocks on your web page. Specifically for the Countdown block, you can set up its Layout and Position.
In Layout:
Layout: Select among Basic, Double highlight, and Single highlight layout.
Text color/Color: Select the colors for your block.
Unit position: Choose where you want the time units to appear.
Show color: Select to show or hide the colon between the time unit.
In Size, select to display the block in small, medium, or large.
In the Quick bar settings, you can quickly edit your block:
Click Settings to edit the block's Content and Design.
Duplicate the block.
Hide the block.
Save the block as a template for later use.
Delete the block.
Click Save once you finished.
B. Stock Countdown
When enabled, the feature adds a progress bar on your product pages to show the number of products remaining. The product countdown will be displayed as below.
From your ShopBase admin, go to Apps > App > Conversion Optimizer. You can also access the Conversion Optimizer app by going to Marketing & Sales > Conversion Optimizer.
In Counting tools, select Use Stock Countdown Block.
The system will direct you to the Website Builder of your product page. Here, you can drag and drop the Stock Countdown block from the Insert panel to the desired position on your page. Then, you can edit the Content and Design of your block.
In Content, you can select to show the Actual stock number recorded in your product inventory, or a random number between a range of your choice.
In Design, you can customize the block's position, alignment, width, height, etc. just like other blocks on your web page. Specifically for the Stock Countdown block, you can set up its Color, Icon, and position of the Progress Bar.
In the Quick bar settings, you can quickly edit your block:
Click Settings to edit the block's Content and Design.
Duplicate the block.
Hide the block.
Save the block as a template for later use.
Delete the block.
Click Save to finish.
C. Real-time Visitors
You can enable this feature to shows a counter of the number of visitors currently viewing the product page to create scarcity and encourage customer to make a purchase. The counter will be displayed as below.
From your ShopBase admin, go to Apps > App > Conversion Optimizer. You can also access the Conversion Optimizer app by going to Marketing & Sales > Conversion Optimizer.
In Counting tools, select Use Real-time Visitors Block.
The system will direct you to the Website Builder of your product page. Here, you can drag and drop the Realtime visitors block from the Insert panel to the desired position on your page. Then, you can edit the Content and Design of your block.
In Content, you can select to show a random number between a range of your choice.
In Design, you can customize the block's position, alignment, width, height, etc. just like other blocks on your web page. Specifically for the Realtime visitors block, you can set up its Highlight Type, and Highlight Color.
In the Quick bar settings, you can quickly edit your block:
Click Settings to edit the block's Content and Design.
Duplicate the block.
Hide the block.
Save the block as a template for later use.
Delete the block.
Click Save to finish.
Related articles
Overview of Conversion Optimizer App
Use Social Proof feature by Conversion Optimizer
Set up Social Proof notification display on Conversion Optimizer
Use Counting Tools feature by Conversion Optimizer
Updated on: 07/07/2023
Thank you!